Tuesday, July 27, 2010

Daring Bakers July 2010: Swiss Roll Ice Cream Cake

In my infinite knowledge (har har), I accidentally almost posted this yesterday! That wouldn't have been good, ha ha. I think I was just a bit frazzled. A huge storm came through my area on Sunday and knocked out my power, and my power didn't come back on until yesterday, 23 hours later! It was a rough bit, and I'm very glad that I made this ice cream cake a couple weeks ago, otherwise it most likely would have melted. Anyways, now that my confusion has been cleared up and I am indeed posting on the correct day, it's time to tell you about this month's Daring Bakers challenge. This is only my third DB challenge, but it was probably one that I was most excited for. I was a little worried at first, because I don't have an ice cream maker (though really want one), but I read that the poster of the recipe had made this recipe without one, so I was quite relieved. Like last time, all of the parts were very easy to put together, but this time, luckily nothing went astray!
This was the first time I've ever made a rolled cake. I was definitely a bit nervous. I still couldn't see how I could roll the cake without it breaking in two. But when the cakes came out of the oven, I certainly saw how! They were very spongy and pliable, and rolled up just fine. However, when they were cooled and I unrolled them to spread them with cream, surely enough, they were quite raggedy and slightly coming apart. Aha, but I said nothing really went astray, right? That's right. When I rolled the cakes back up with the cream, they certainly didn't look very pretty, but when I sliced into them and lined the bowl with them, they looked perfectly fine and nice (well, they could have been nicer, but not too bad for a first-timer). Woohoo! After that, everything went pretty quick and easy. Well, I say quick, but I mean putting them together. There was a lot of down time while making this, though. I assume if you had an ice cream maker, it would probably go a heck of a lot faster for you. Because I didn't have one, I used a method where I just put the ice cream bases in the freezer and as it froze, I took it out every once and a while and beat it with a wooden spoon. Though I have to admit I got a little slack...the ice cream took several hours to freeze totally! But I was happy to do it. Oh, and the hot fudge sauce? Probably the easiest, and very yummy!
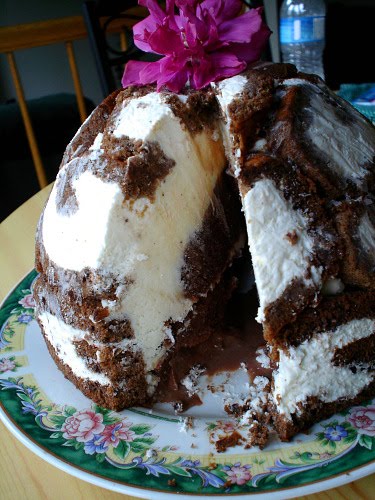
So how did it taste? Very, very good! This is probably the most satisfied I've been with a DB challenge so far. In terms of taste, I think maybe the croquembouche was my favorite by just a slight hair, but the Swiss roll ice cream cake was delicious and much better looking than my croquembouche, so it wins for now. My only complaint would be that my favorite part of the cake was the one thing that there seemed to be the least amount of: the chocolate ice cream. Of course, Sunita, the daring baker who provided the challenge, did give us free reign on ice cream flavors, so I guess I'm to blame for that one. So I encourage you to give this recipe a try and don't be afraid to change up some of the flavors. There is lots of downtime, but it's certainly worth it in the end!

Swiss Roll Ice Cream Cake (inspired by the Swiss roll ice cream cake from Taste of Home; recipes developed by Sunita of Sunita’s world – life and food)
Makes 1 large cake

For the swiss rolls:
  • 6 medium sized eggs
  • 1 cup caster sugar
  • 6 tablespoons all-purpose flour
  • 5 tablespoons cocoa powder
  • 2 tablespoons boiling water
  • extra caster sugar or powdered sugar for rolling
  • oil for brushing the pans
For the cream filling:
  • 2 cups heavy whipping cream
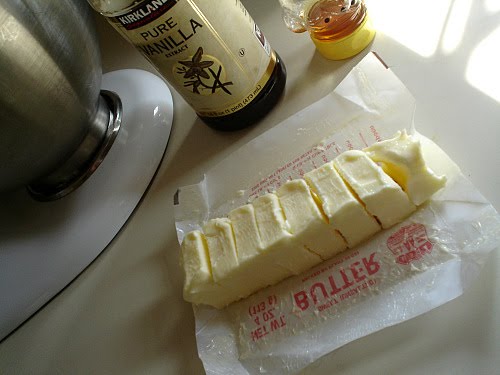
  • 1 vanilla bean, cut into small pieces (or 1 teaspoon vanilla extract)
  • 5 tablespoons caster sugar
Directions
  1. For the cake: Preheat the oven to 400 degrees F. Brush two 9x11 inch baking pans with a little oil and line with greaseproof baking paper (okay, I looked and looked for 9x11 inch pans, but I'm just not sure if they sell them in the US, so I baked mine in an 8x11, which was the closest I could find). If you have just one pan, bake one cake and then let the pan cool completely before using it for the next cake.
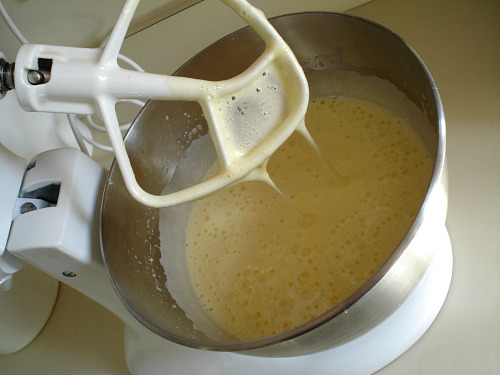
  2. In a large mixing bowl, add the eggs and sugar and beat till very thick; when the beaters are lifted, it should leave a trail on the surface for at least 10 seconds.
  3. Add the flour mixture, in three batches and fold in gently with a spatula. Fold in the water.
  4. Divide the mixture among the two baking pans and spread it out evenly, into the corners of the pans. Place a pan in the center of the preheated oven and bake for about 10-12 minutes or till the center is springy to the touch.
  5. Spread a kitchen towel on the counter and sprinkle a little caster sugar (or powdered sugar) over it. Turn the cake on to the towel and peel away the baking paper. Trim any crisp edges. Starting from one of the shorter sides, start to make a roll with the towel going inside. Cool the wrapped roll on a rack, seam side down. Repeat for the next cake as well.
  6. For the cream filling: Grind together the vanilla pieces and sugar in a food processer till nicely mixed together. If you are using vanilla extract, just grind the sugar on its own and then add the sugar and extract to the cream.
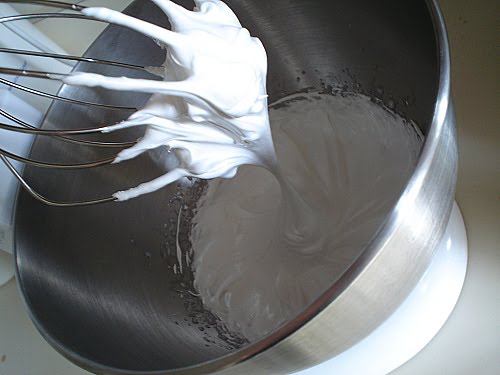
  7. In a large bowl, add the cream and vanilla-sugar mixture and beat till very thick. Divide the cream mixture between the completely cooled cakes.
  8. Open the rolls and spread the cream mixture, making sure it does not go right to the edges (a border of ½ an inch should be fine). Roll the cakes up again, this time without the towel. Wrap in plastic wrap and chill in the fridge till needed, seam side down.
For the vanilla ice cream:
  • 2 1/2 cups heavy whipping cream
  • 1 vanilla bean, cut into piece or 1 teaspoon vanilla extract
  • 1/2 cup granulated sugar
Directions
  1. Grind together the sugar and vanilla in a food processor. In a mixing bowl, add the cream and vanilla sugar mixture and whisk lightly till everything is mixed together. If you are using the vanilla extract, grind the sugar on its own and then and the sugar along with the vanilla extract to the cream.
  2. Pour into a freezer friendly container and freeze till firm around the edges. Remove from the freezer, beat till smooth and return to the freezer. Do this 3-4 times and then set completely.
For the hot fudge sauce:
  • 1 cup caster sugar
  • 3 tablespoons cocoa powder
  • 2 tablespoons cornstarch
  • 1 1/2 cups water
  • 1 tablespoon butter
  • 1 teaspoon vanilla extract
Directions
  1. In a small saucepan, whisk together the sugar, cocoa powder, cornstarch and water.
  2. Place the pan over heat, and stir constantly, till it begins to thicken and is smooth (for about 2 minutes).
  3. Remove from heat and mix in the butter and vanilla. Keep aside to cool.
For the chocolate ice cream:
  • 2 cups heavy whipping cream
  • 1 cup caster sugar
  • 3 tablespoons cocoa powder
Directions
  1. Grind together the sugar and the cocoa powder in a food processor.
  2. In a saucepan, add all the ingredients and whisk lightly. Place the pan over heat and keep stirring till it begins to bubble around the edges.
  3. Remove from heat and cool completely before transferring to a freezer friendly container till firm around the edges. If you are using an ice cream maker, churn the ice cream according to the manufacturer’s instruction, after the mixture has cooled completely.
  4. Remove from the freezer, beat till smooth and return to the freezer. Do this 3-4 times and then set completely.
Assembly:
  1. Cut the Swiss rolls into about 20 equal slices (approximately 1 inch each).
  2. Cover the bottom and sides of the bowl in which you are going to set the dessert with cling film/plastic wrap. (I used my 4.5 quart Kitchen Aid bowl...it's about 8 1/2 inches in diameter and 6 1/2 inches deep.)
  3. Arrange two slices at the bottom of the pan, with their seam sides facing each other. Arrange the Swiss roll slices up the bowl, with the seam sides facing away from the bottom, to cover the sides of the bowl. Cover the bowl with plastic wrap and freeze till the slices are firm (at least 30 minutes).
  4. Soften the vanilla ice cream. Take the bowl out of the freezer, remove the cling film cover and add the ice cream on top of the cake slices. Spread it out to cover the bottom and sides of the bowl. Cover the bowl with plastic wrap and freeze till firm (at least 1 hour).
  5. Add the fudge sauce over the vanilla ice cream, cover and freeze till firm (at least an hour).
  6. Soften the chocolate ice cream and spread it over the fudge sauce. Cover with plastic wrap and freeze for at least 4-5 hours till completely set .
  7. Remove the plastic cover, and place the serving plate on top of the bowl. Turn it upside down and remove the bowl and the plastic lining. If the bowl does not come away easily, wipe the outsides of the bowl with a kitchen towel dampened with hot water. The bowl will come away easily.
  8. Keep the cake out of the freezer for at least 10 minutes before slicing, depending on how hot your region is. Slice with a sharp knife, dipped in hot water.
The July 2010 Daring Bakers’ challenge was hosted by Sunita of Sunita’s world – life and food. Sunita challenged everyone to make an ice-cream filled Swiss roll that’s then used to make a bombe with hot fudge. Her recipe is based on an ice cream cake recipe from Taste of Home.-

Friday, July 16, 2010

MBCC: Spiced Vanilla Honey Tea Cupcakes

I am beyond excited to share this recipe! But first, I should give a little background. The owner of a blog I really like to visit, Jamieanne of The Sweetest Kitchen, has decided to hold a cupcake competition each month. She's called it the Mystery Box Cupcake Challenge (which I have shortened to MBCC in the title), where each month there is a secret ingredient that is revealed and then competitors have to create a cupcake that incorporates this ingredient. This is the very first month and I immediately knew that if I got the time, I wanted to enter. At other blogs I like to visit, I've seen people competing in such cupcake competitions as Iron Cupcake, and I always wanted to try my hand at it because it seemed like a lot of fun. And not only that, but it would give me the chance to try and create my own recipes and expand my horizon as a baker. This competition has given me just the chance! I would encourage anyone to check it out as I have already had a lot of fun with this month's challenge and am going to continue entering each month that I get a chance! For all the info, Jamieanne has compiled all of the rules and guidelines right here.

So, onto the actual cupcake! This month's secret ingredient was tea. Tea! I'm not sure if I've ever mentioned it before, but I absolutely love tea. It's my favorite drink and we drink it like crazy at my house. We can make a huge pitcher of black tea and have it be gone or close to gone the next day. (And did I mention there's only 3 of us?) After my last adventure of creating my own coconut muffin recipe, I was super excited to try and create another recipe I could call my own. I started thinking of flavor combinations that I thought would be good. Spice, of course. But what about vanilla? And honey? How about all of them?! Sounds good to me! So I took my favorite yellow cake recipe and started tweaking and changing it to my liking.

For the spices, I knew I wanted cinnamon, and nutmeg sounded good too, but what about some ginger? I've actually never used ground ginger in a recipe before, but it sounded like it would be a good addition, so I added it in. I changed the regular sugar in the recipe to vanilla sugar and cut the sugar down a bit to replace some of it with honey. And of course, I put tea bags into the warm milk called for in the recipe to steep. For the frosting, I was thinking either a honey Swiss meringue buttercream or a cooked frosting that had spices in it. I've made a cooked frosting before and wasn't too sure if I liked it. I've been meaning to try one again to see if I like it any better, but because I knew that I already loved Swiss meringue buttercream, that one won. I knew that I had to go through multiple trials with my coconut muffins to get them perfect, so I was prepared to do so again with this recipe. So with a determination, I went off into my kitchen to bake.
After the batter was prepared, I tasted it. It was good! But still needed a little something extra. I doubled the cinnamon, and although I had initially decided not to add vanilla extract because I had already used vanilla sugar, I went ahead and added some anyway and tasted the batter again. Wow!! It was delicious! I never expected it to be that good. My spirits flew. Could these cupcakes actually turn out really good on the first try? I put them in the oven and crossed my fingers. I pulled them out and let them cool and then started on the SMBC. I subtracted a little sugar from my usual standards (1/4 cup of sugar per egg white) since I was adding honey. The butter remained at 1/4 cup per egg white. After making the cupcakes, I actually didn't have too much honey left. But that didn't matter as only a small amount sufficed just fine. My planned recipe had called for more, but it didn't need it. I added some vanilla to keep with the vanilla honey theme and it was delicious! So after frosting the cupcakes and snapping pictures, I bit into one. WOW! It was out of this world! And there are really no words to describe how proud of myself I was. The cupcakes were so tender and had lovely flavor and the buttercream was perfect for them. I am so thankful to Jamieanne's contest even if I don't win, because it has given me the chance to see that I can come up with my own recipes and have them turn out well, and allowed me to have so much fun and gain confidence as a baker at the same time. I look forward to entering her contest again and again!

Spiced Vanilla Honey Tea Cupcakes (original yellow cake recipe from A Passion for Baking by Marcy Goldman; all tweaks and changes made by yours truly)
Makes 12 cupcakes (**Again, I will warn you as I did with the coconut muffins, I have only ever made half of this recipe before, never the full recipe. But I will state again that I have never had problems scaling up or down recipes, so this full recipe should be fine.)

Ingredients
  • 1 cup milk
  • 2 black tea bags
  • 1/2 cup unsalted butter, softened
  • 3/4 cup vanilla sugar (If you don't have vanilla sugar, you can use regular granulated and increase the amount of vanilla extract to 2 teaspoons.)
  • 1/4 cup honey
  • 1 large egg
  • 1 teaspoon vanilla extract
  • 1 1/2 cups all-purpose flour
  • 2 teaspoons baking powder
  • 1/4 teaspoon salt
  • 1 teaspoon ground cinnamon
  • 1/4 teaspoon ground ginger
  • pinch ground nutmeg
Directions
  1. Preheat the oven to 350 degrees F. Line a standard cupcake pan with liners.
  2. In a small, microwave-safe, microwave the milk for about a minute or until hot. Remove from the microwave and add the tea bags. Let the tea bags steep in the milk as you prepare the other ingredients.
  3. In a large mixing bowl, cream the butter, sugar, and honey until light and fluffy. Add the egg and vanilla and mix well.
  4. In a medium bowl, mix together the flour, baking powder, salt, cinnamon, ginger, and nutmeg. Retrieve the tea-infused milk and squeeze out any milk that was absorbed by the tea bags back into the rest of the milk. With the mixture running, add the dry ingredients to the butter mixture alternately with the tea-infused milk. Mix just until combined.
  5. Divide the batter evenly between the cupcake liners and bake the cupcakes for 18-20 minutes or until a toothpick inserted in the center of one comes out clean. Let cool in the pan for about 5 minutes, then remove to a wire rack to cool completely.
Vanilla Honey Swiss Meringue Buttercream (from my own mind)
Makes enough to frost 12 cupcakes

Ingredients
  • 3 egg whites
  • 1/2 cup plus 2 tablespoons granulated sugar
  • pinch salt
  • 3/4 cup (1 1/2 sticks) unsalted butter, softened
  • 1 tablespoon honey
  • 1 1/2 teaspoons vanilla extract
Directions
  1. Fill a large saucepan with about an inch of water and bring it to a simmer. In a heat friendly mixing bowl, place the egg whites, sugar, and salt, and fit the bowl over top of the pan, making sure that the simmering water does not touch the bottom of the bowl. Whisk the egg mixture constantly until a candy thermometer reads 160 degrees, about 5 minutes. If you don't have a candy thermometer, dip your finger into the egg mixture and rub it between your fingers. If it feels hot to the touch and it no longer feels grainy from the sugar, the mixture is ready.
  2. Place the egg mixture in a bowl of a stand mixer and fit the stand mixer with the whisk attachment. Whisk the mixture until it forms a meringue and comes to room temperature, about 5-7 minutes. (Feel the bowl in order to tell if it has come to room temperature. If the bowl no longer feels warm at all, it's good to go.)
  3. Switch to the paddle attachment and put the mixer on low speed. Add the butter one tablespoon at a time, waiting a couple seconds between each tablespoon. Once all of the butter has been added, turn the mixer on high and beat it until it forms a smooth, creamy buttercream, about 6-10 minutes. If at any time the mixture looks curdled, don't be alarmed. This is normal; just keep beating and the mixture will come back together. Also, if it ever appears to be very soupy, again, keep mixing, it'll thicken up.
  4. Once the buttercream is smooth and creamy, add the honey and vanilla on low speed and continue mixing for a minute or two to completely incorporate the ingredients and to remove any air pockets. Use to frost cupcakes and enjoy!!

The winner of July’s Mystery Box Cupcake Challenge will receive prizes from:
Thank you to all our prize sponsors!

Friday, July 9, 2010

Harpoon Hanna's Coconut Muffins Copycat

UPDATE! : I've recently remade these muffins using regular milk and a little bit of the vanilla butter & nut flavoring that I said I wanted to try and I think I hit the jackpot! They really are like Harpoon Hanna's muffins. Delicious! Also, the texture just isn't the same if applesauce is used. You can still use it if you wish, but if you're not too worried about it, definitely go with the oil. I've modified the recipe below. I've also edited the title to reflect what this recipe is really about.

I mentioned last post that I had finally created a recipe that I could call my own, and so now, here it is! This muffin recipe is copycat of a muffin I encountered when I was on vacation. I went to a restaurant called Harpoon Hanna's, and what they do is send around someone with a basket of bread and muffins for you to have while you're waiting for your food. One of the items was a coconut muffin, and although I'm always a bit iffy on coconut, I decided to try one anyway. And OMG! Amazing muffin!! It was so delicious that I decided there on the spot to try and recreate the recipe when I got home. So what I did was start off with a very basic muffin recipe that I found here on Allrecipes. And then I tweaked and tweaked the recipe until I finally got a delicious muffin! I went through 3 trials before I achieved really great coconut muffins, and then went through one last 4th trial just to substitute some applesauce for some of the oil, and it turned out great. I don't think they're quite as good as Harpoon Hanna's, but they still are a darn good muffin and one that I'm very proud that I was able to create.

The muffins are nice and fluffy and almost cupcake-like, which was like the muffins at Harpoon Hanna's. The muffins there though almost seemed to taste a bit like yellow cake mix, which I was going to try and compensate for by adding a little vanilla butter & nut flavoring, which I've mentioned before is basically like yellow cake mix in a bottle, but I also knew that I wanted to be able to share this recipe and a lot of people might have trouble finding it. In the end, I left it out, but if you ever happen to come across some, try it! It would probably be great in the muffins! (Edit: As I've mentioned in my update above, I ended up using it and it really makes the muffin. Try and find it, if you can. If not, just use regular vanilla in place of it.) The muffins also have a great, not too overpowering coconut flavor and a nice finish of vanilla. I think I did the best I could do, but you never know...I could still try tweaking it some more and making it an even better recipe! If I do, I'll be sure to post updates on this post. So if you're in the mood for coconut, or if you happen to also have been to Harpoon Hanna's and had their amazing coconut muffins, give this recipe a try and tell me what you think! I'd love feedback!

Coconut Muffins (base recipe from Allrecipes, all tweaks and changes made by yours truly)
** I must warn you. I have never made a batch of this scaled up recipe. All trials I did were in 1/4 batches that made about 4 muffins. Note that this scaled up recipe should make anywhere from 12-16 muffins. I have never had trouble scaling up or down recipes, so this one should be fine.

Ingredients
  • 2 cups all-purpose flour
  • 1 tablespoon baking powder
  • 1/2 teaspoon salt
  • 1/2 cup granulated sugar
  • 1/2 cup packed light brown sugar
  • 2 large eggs
  • 1 cup milk
  • 1/2 cup vegetable oil
  • 2 teaspoons vanilla extract
  • 1 teaspoon vanilla butter & nut flavoring
  • 1 teaspoon coconut extract
  • 1/2 cup shredded coconut, plus more for garnish if desired
Directions
  1. Preheat the oven to 350 degrees F. Line muffin tin(s) with paper liners.
  2. In a large bowl, mix together the flour, baking powder, salt, and both sugar until well combined. Set aside.
  3. In a medium bowl, whisk together the eggs, milk, oil, and extracts until combined. Create a well in the dry ingredients and then pour the wet ingredients into the well. Mix until the flour is almost all the way incorporated and then add the shredded coconut. Continue mixing JUST until combined. Do NOT overmix!
  4. Fill the muffin cups 3/4 of the way full with batter and sprinkle with extra coconut if desired. Bake for 18-20 minutes, or until a toothpick inserted in the center of one of the muffins comes out clean. Cool muffins in the pan for about 5 minutes, then remove to a wire rack to cool completely.

Friday, July 2, 2010

Milk Chocolate Chip Cookies

Some people out there don't like milk chocolate in their cookies. Generally it's too sweet for an already sweet cookie. But sticking true to my blog name, I have a monster sweet tooth, so I say bring on the milk chocolate! It's actually my favorite type of chocolate, and I know, I know, it's the worst kind out there for you, but still so amazingly milky and creamy and sweet that I just can't get enough of it! I started getting a craving for some milk chocolate chip cookies, so immediately went on a little search. My search took me to this blog where she originally got the recipe off of Hershey's Canadian website and the cookies looked and sounded fantastic! I immediately put the recipe on my to bake list and waited for a time when I had a chance to make them.

As I've mentioned practically every time I post a cookie recipe, I ALWAYS refrigerate the cookie dough because it just makes better cookies. They're thicker and chewier, which is my favorite type of cookie. But every once in a while, I don't feel like waiting so I'll just make 2 or 3 cookies before putting the rest of the dough in the fridge. I did with this recipe and...big mistake. The cookies were extremely cake-like, which I should have realized being as the recipe uses baking powder. The were also kind of dry and just not that flavorful. That made me a little scared. Could refrigeration even help this recipe? I wasn't so sure. But I stuck the rest of the dough in the fridge and hoped anyway. So after chilling overnight, I again went to make cookies and...success! I underbaked them slightly and it resulted in a wonderful, slight puffy and very chewy cookie! I did think the cookies needed a bit more salt in them though. I used salted butter and didn't add any additional salt, and I think they need a bit. They were very good, but just needed that extra little edge that salt gives, so I'll keep that in mind if I make them again.

Also, did you notice? I finally did away with the letters on my pictures. I've never been completely sure about the letters, but for a while now I've been considering getting rid of them, so now I finally have and I think I like it a lot better. And stay tuned for my very own coconut muffin recipe! Yes, I took a basic muffin recipe, and tweaked and tweaked it and finally have my very first recipe that I can call my own. I'm so happy! Please look forward to them!

Chewy Milk Chocolate Chip Cookies (from Hershey Canada)
Makes about 5 dozen small cookies, less if making them larger

Ingredients
  • 2/3 cup melted butter (I used salted, and I would suggest that)
  • 2 cups lightly packed brown sugar
  • 2 eggs
  • 2 tablespoons hot water
  • 2 2/3 cups all-purpose flour
  • 1 teaspoon baking powder
  • 1 teaspoon baking soda
  • 1/4 teaspoon salt (Make sure to add this even if you use salted butter. If you use unsalted butter, I would increase this to about 3/4 teaspoon.)
  • 1 (12 ounce) package milk chocolate chips
Directions
  1. Preheat the oven to 375 degrees F.
  2. In a large bowl, beat melted butter, brown sugar, eggs, and hot water until smooth.
  3. In a medium bowl, mix together the flour, baking powder, baking soda, and salt. Stir into the butter mixer until well blended. (The dough will be really liquidy looking, so don't worry about it.)
  4. Stir in the milk chocolate chips. Drop from small teaspoon onto an ungreased cookie sheet. (I used probably more like 1 1/2 tablespoons per cookie.)
  5. Bake 8 to 10 minutes. Let cool 1 minute on the cookie sheets, then remove to a wire rack. (I baked my refrigerated dough for only about 6 minutes. If you don't refrigerate your dough or make your cookies smaller, I would suggest and even shorter cooking time. Just be sure to watch them.)