Showing posts with label chocolate chip. Show all posts

Sunday, October 17, 2010

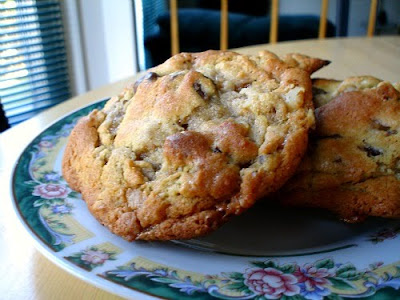
Chocolate Chip Walnut Toffee Cookies

I saw this recipe over at Cookie Madness quite a while ago, and have been dying to make it ever since. It actually is supposed to be a copycat recipe for the cookies they sell at the Doubletree Hotel. However, I know nothing about those cookies or that hotel, so I thought it wouldn't be fair to name my post "Doubletree Copycats" when I can't tell you anything about the originals and how they compare to this recipe (as opposed to the Levain copycats, in which I've never tasted the original, but at least I know a bit about them to compare). So why was I so attracted to this recipe then? Well, Anna's photo got me hooked, and as I read further, I saw that they had not only chocolate chips and walnuts in them, but toffee bits too! The toffee bits in particular made me want to try this recipe. I haven't used toffee bits in forever, so a cookie that contained all that wonderfulness sounded amazing.

But here's the reason why it took me so long to make them...I couldn't find toffee bits! Every store I went in that sold grocery items, I checked for toffee bits. Not a one had them. Finally, about a week ago, I went into a grocery store that I hardly ever go in to take advantage of some sales I saw in their circular. I thought I would take a stroll around the store just to see what they had, and when I hit the baking aisle, lo and behold. There were Heath Bits o' Brickle. I didn't think twice before snagging a bag off the shelf, inwardly squealing for joy, and making a mental note that this store carried toffee bits for future reference. So how were the cookies? Delicious! The toffee bits really paired nicely with the chocolate chips and walnuts. An interesting thing about this recipe is that it's very similar to the fake Neiman Marcus recipe, which I'm sure you all have heard of at least once. It contains oatmeal that you grind into a fine powder before adding, and a grated milk chocolate bar (although I omitted). I've actually made the fake NM recipe, and I remember it being delicious as well, but with the addition of walnuts and toffee bits that this recipe has, it's even more special and definitely worth making again and again.

Chocolate Chip Walnut Toffee Cookies
(from Cookie Madness)
This is a smaller batch that makes a little more than a dozen. For the full recipe, go here.

Ingredients
  • 1 cup all-purpose flour
  • 1 cup plus 2 tablespoons oatmeal (measure, then grind), ground in a coffee grinder or food processor
  • 1/2 teaspoon baking powder
  • 1/2 teaspoon baking soda
  • 1/2 scant teaspoon salt
  • 1/2 cup (1 stick) unsalted butter, cold, cut into pieces
  • 1/4 cup granulated sugar
  • 3/4 cup packed light brown sugar
  • 1 large egg
  • 1 teaspoon vanilla
  • 1 cup semisweet chocolate chips
  • 1/2 cup toffee bits
  • 3/4 cups walnuts, chopped
Directions
  1. Mix flour, oatmeal, baking powder, baking soda and salt; set aside. Cream butter and sugars in large mixer bowl. Add egg and vanilla and stir until mixed.
  2. Add flour mixture and oatmeal gradually, stirring until incorporated. Stir in toffee bits, chocolate chips, and nuts. Scoop dough up with a quarter cup measure and shape into big balls. Press them slightly to make discs. Set the discs on a plate and chill for a few hours or until firm. (I didn't bother with this, I just wrapped all of the dough in plastic wrap, chilled completely, and then scooped round balls onto the baking sheet. Not flattening the dough = thicker, chewier cookies.)
  3. Place on parchment lined cookie sheets about 3 inches apart. Bake at 375 degrees for 8-13 minutes. Cookies should still be slightly underdone. Move to wax paper lined counter to cool, do not use wire racks. (I'm not sure the reason for this or what it achieves. Again, I just skipped it, and used wire racks.)

Friday, July 2, 2010

Milk Chocolate Chip Cookies

Some people out there don't like milk chocolate in their cookies. Generally it's too sweet for an already sweet cookie. But sticking true to my blog name, I have a monster sweet tooth, so I say bring on the milk chocolate! It's actually my favorite type of chocolate, and I know, I know, it's the worst kind out there for you, but still so amazingly milky and creamy and sweet that I just can't get enough of it! I started getting a craving for some milk chocolate chip cookies, so immediately went on a little search. My search took me to this blog where she originally got the recipe off of Hershey's Canadian website and the cookies looked and sounded fantastic! I immediately put the recipe on my to bake list and waited for a time when I had a chance to make them.

As I've mentioned practically every time I post a cookie recipe, I ALWAYS refrigerate the cookie dough because it just makes better cookies. They're thicker and chewier, which is my favorite type of cookie. But every once in a while, I don't feel like waiting so I'll just make 2 or 3 cookies before putting the rest of the dough in the fridge. I did with this recipe and...big mistake. The cookies were extremely cake-like, which I should have realized being as the recipe uses baking powder. The were also kind of dry and just not that flavorful. That made me a little scared. Could refrigeration even help this recipe? I wasn't so sure. But I stuck the rest of the dough in the fridge and hoped anyway. So after chilling overnight, I again went to make cookies and...success! I underbaked them slightly and it resulted in a wonderful, slight puffy and very chewy cookie! I did think the cookies needed a bit more salt in them though. I used salted butter and didn't add any additional salt, and I think they need a bit. They were very good, but just needed that extra little edge that salt gives, so I'll keep that in mind if I make them again.

Also, did you notice? I finally did away with the letters on my pictures. I've never been completely sure about the letters, but for a while now I've been considering getting rid of them, so now I finally have and I think I like it a lot better. And stay tuned for my very own coconut muffin recipe! Yes, I took a basic muffin recipe, and tweaked and tweaked it and finally have my very first recipe that I can call my own. I'm so happy! Please look forward to them!

Chewy Milk Chocolate Chip Cookies (from Hershey Canada)
Makes about 5 dozen small cookies, less if making them larger

Ingredients
  • 2/3 cup melted butter (I used salted, and I would suggest that)
  • 2 cups lightly packed brown sugar
  • 2 eggs
  • 2 tablespoons hot water
  • 2 2/3 cups all-purpose flour
  • 1 teaspoon baking powder
  • 1 teaspoon baking soda
  • 1/4 teaspoon salt (Make sure to add this even if you use salted butter. If you use unsalted butter, I would increase this to about 3/4 teaspoon.)
  • 1 (12 ounce) package milk chocolate chips
Directions
  1. Preheat the oven to 375 degrees F.
  2. In a large bowl, beat melted butter, brown sugar, eggs, and hot water until smooth.
  3. In a medium bowl, mix together the flour, baking powder, baking soda, and salt. Stir into the butter mixer until well blended. (The dough will be really liquidy looking, so don't worry about it.)
  4. Stir in the milk chocolate chips. Drop from small teaspoon onto an ungreased cookie sheet. (I used probably more like 1 1/2 tablespoons per cookie.)
  5. Bake 8 to 10 minutes. Let cool 1 minute on the cookie sheets, then remove to a wire rack. (I baked my refrigerated dough for only about 6 minutes. If you don't refrigerate your dough or make your cookies smaller, I would suggest and even shorter cooking time. Just be sure to watch them.)

Monday, June 14, 2010

Honey Peanut Butter Chocolate Chunk Cookies

Surprise! I thought I wasn't going to be posting anything between my last post and my Daring Bakers post because I thought Father's Day was sooner than it actually is. I though I might have too many desserts in the house, so I wouldn't be baking anything else, but because it's not coming up for about another week, I decided to go ahead and make some cookies. The theme I was thinking for these cookies was honey nut. But I didn't actually want nuts in the cookies, and thought of peanut butter instead. And then I thought, why not add oatmeal too? By using Allrecipe's nifty little ingredient searcher, I came across this recipe that had a perfect 5-star rating. Although it didn't have that much oatmeal in it (which is why I left 'oatmeal' out of the title), it still sounded like a winner and with a 5-star rating and chocolate chunks added in, how could I refuse?

The cookie was excellent and oh, so chewy which is what I love so much about peanut butter cookies. They practically never lose their chewiness. The honey and oatmeal are just barely detectable and add a nice little twist to the cookies. For the chocolate chunks, I used the rest of a Ghirardelli's Intense Dark 72% bar that I had leftover from an unfortunately failed dessert. I was so upset about wasting 1 1/2 bars in a dessert that I messed up that I chopped the rest up and put it in these simple peanut butter cookies just to spite the dessert. Ha ha, I'm silly aren't I? But I digress... (More on the failed dessert in a later post.) The resulting cookie was extremely tasty with the chocolate, but of course, feel free to use whatever kind of chocolate you like. Maybe even some chopped up peanut butter cups in them? I'll definitely try it out sometime because this recipe is a keeper that I'll make again and again.


Honey Peanut Butter Chocolate Chunk Cookies
(from Allrecipes)
Makes about 2 dozen good-sized cookies

Ingredients
  • 1 1/2 cups all-purpose flour
  • 1/3 cup rolled oats
  • 1 teaspoon baking soda
  • 1/4 teaspoon salt
  • 1 cup crunchy peanut butter (I used smooth)
  • 1 cup packed brown sugar
  • 1/2 cup unsalted butter
  • 1/4 cup honey
  • 1 egg
  • 1 teaspoon vanilla extract
  • 5 (1 ounce) squares semisweet chocolate, chopped
Directions
  1. Mix together flour, oats, baking soda, and salt in a medium bowl. Set aside.
  2. Using an electric mixer, beat peanut butter, brown sugar, butter, honey, egg, and vanilla until well blended.
  3. Stir dry ingredients into the peanut butter mixture in 2 additions. Stir in chopped chocolate.
  4. Cover and refrigerate until the dough is firm and no longer sticky, about 30 minutes. (I refrigerated mine for several hours.)
  5. Preheat the oven to 350 degrees F. Butter 2 heavy, large baking sheets. (I used parchment paper.) With hands, roll heaping tablespoons of dough for each cookie into a 1 3/4 quarter inch diameter ball. Arrange cookies on prepared baking sheets, spacing 2 1/2 inches apart. (I used probably more like 2 tablespoons of dough per cookie.)
  6. Bake cookies until puffed, beginning to brown on top and still very soft to the touch, about 12 minutes. Cool cookies on the baking sheet for about 5 minutes, then remove to a wire rack to cool completely.

Wednesday, June 2, 2010

Levain Copycats

Happy June, everyone! I hope everyone had a great Memorials Day weekend. This is an amazing recipe to start off the new month. I think this cookie has just become my new favorite chocolate chip cookie! This is a copycat recipe of the chocolate chip walnut cookies from Levain Bakery. Levain seems to be pretty well known, but if you don't know what I'm talking about, they're a bakery up in New York that sells monstrous 6 oz. cookies of four different kinds: chocolate chip walnut, dark chocolate chocolate chip, oatmeal raisin, and dark chocolate peanut butter chip. They're famous for being crazy ooey gooey on the inside, with a nice crunch on the outside and of course, their monstrous size. If you go to their website, you can see some pictures of the inside of their amazing cookies. The funny thing about all this? I've never actually had one of their cookies. I've only been to NY once, and we never got a chance to go up there, but I've still dreamed about having one of those amazing chocolate chip walnuts since I heard about them. I actually had walnuts in the pantry for once, so I had to settle for the copycat for now.
A baked cookie compared to a fortune cookie. (The cookie dough ball below step 4 is compared to a quarter.)

The copycat recipe that I used seems to be the one that's pretty much settled on as THE copycat recipe to use. If you type in "Levain copycat recipe" into Google, this particular recipe is the one that always comes up. The only difference I spotted was varying amounts of baking powder/soda. One version of the recipe contains more baking powder than soda (which was the one that I used) and one contains more baking soda than powder. I may try the other one next time, but the one I used was so amazing that I'm not sure if I want to! The cookie was wonderfully chewy and had great flavor, and honestly made me wonder why I don't put walnuts in my chocolate chip cookies more often. The recipe doesn't have any vanilla in it (which the owners of Levain have stated that they don't use) and I actually did taste a difference in the dough. As a lover of vanilla extract, this has kind of boggled me. Maybe I might try not putting any vanilla in some of my tried and true cookie recipes just to see what a difference it makes? All I know is that you have to try this recipe. If the actual Levain cookies taste anything like these copycats, they have to be out of this world!

Levain Copycats (from the commenter Lisa on Su Good Sweets)
Makes 12 BIG cookies

Ingredients
  • 1 cup (2 sticks) unsalted butter, cold and cubed
  • 3/4 cup granulated sugar
  • 3/4 cup brown sugar
  • 2 eggs
  • 3 1/4 to 3 1/2 cups all-purpose flour (I only needed 3 1/4 cups...more notes below)
  • 3/4 teaspoon Kosher salt
  • 1 teaspoon baking powder
  • 1/4 to 1/2 teaspoon baking soda (I used a rounded 1/4)
  • 12 oz (2 cups) good quality semisweet chocolate chips (I only used 6 oz of semisweet chunks and it was plenty, but feel free to use however much chocolate you want)
  • 1 cup walnuts
Directions
  1. In a large mixing bowl, mix together flour, salt, baking powder, and baking soda. Set aside. (For the flour, Lisa said to go by the feel of the dough. You want the dough to be workable by your hands without it being sticky or sticking very little. I only needed 3 1/4 cups of flour and the dough was perfectly workable without being sticky at all. She didn't clarify on the baking soda, however, so I just put in a rounded 1/4 teaspoon.)
  2. Place the cold, cubed butter in the bowl of an electric mixer. Beat on medium speed until it becomes creamy. Add both sugars and beat until light and fluffy. Add the eggs one at time, mixing until fully incorporated.
  3. Add the dry ingredients a little bit at a time until fully incorporated. Add the chocolate and walnuts and mix in by hand or on the lowest speed of your mixer.

  4. Portion the dough into 12 equal portions (Lisa said that each portion will weigh more like 4 oz. instead of 6. I don't have a scale however, so I'm going by her word.) Refrigerate the dough until completely chilled or overnight. (You can skip this step, but I highly recommend that you don't. Refrigeration allows for a much chewier cookie.)

  5. Preheat the oven to 350 degrees. Situate the cookies about 2 inches apart on a baking sheet lined with parchment paper (they don't spread that much, so don't worry about that). Bake for 16 to 20 minutes. (I baked for 16 minutes at 350 and then turned it up to 375 and baked for 5 minutes more and they were perfect. Use your better judgement.) Cool on the cookie sheet slightly and then remove to wire racks.

Thursday, May 20, 2010

Everything-but-the-Kitchen-Sink Cookies

So finally, here is recipe #3. It's been crazy here recently with me baking up a storm, what with preparing for two birthdays as well as the upcoming Daring Bakers Challenge. But of course, I always love an excuse to bake! I came across this recipe when I was actually just looking for a spice cookie recipe. I came to a conclusion that there must not really be any spice cookies worthwhile that didn't contain molasses in it, something I didn't have, so gave up on it. But the search led me to this cookie, and I'm very happy it did! I've seen recipes for "Everything" cookies before, but my picky-eating-ness would always spot multiple things in the recipe that I wasn't a fan of. Either that, or I found that the recipe just didn't have enough ingredients in them to warrant being called "Everything-but-the-Kitchen-Sink." But this recipe on Allrecipes sounded great, with a lot of things I like, from everything to oatmeal and cornflakes to walnuts and chocolate chips, had great reviews, and used spices that I had been wanting to use.

The everything! (Also, apologies for all the brand-name dropping. It wasn't intended.)

These cookies have great flavor and all of the elements work really well. The poster of the recipe said that by underbaking the cookies slightly would yield a nice chewy cookie, and she was right. The gooeyness firms up when you let them cool and you're left with a chewy center, but still a nice crunch from the ingredients. I do have to admit that I left out the coconut since I'm usually not a fan, but I think it'd work really well in this cookie and I'd be willing to give it a try. I would advise, however, to maybe cut down on the sugar slightly or add less chocolate chips. My cookies turned out quite sweet, even for someone with a monster sweet tooth like me. I also might try them at some point without any spices, as I think they'd be great too. But I'd definitely suggest trying the recipe as is first, since it really is a great recipe.

Everything-but-the-Kitchen-Sink Cookies (from Allrecipes)
Makes about 4-5 dozen cookies

Ingredients
  • 1 1/2 cups all-purpose flour
  • 1 1/4 teaspoons baking soda
  • 1 teaspoon salt
  • 1 1/2 teaspoons ground cinnamon
  • 1 teaspoon ground mace (I didn't have this, so I substituted with just an extra pinch of nutmeg)
  • 1/8 teaspoon ground nutmeg
  • 1/8 teaspoon ground cloves
  • 1 cup butter, softened
  • 1 1/2 cups packed brown sugar
  • 1 cup white sugar
  • 2 eggs
  • 1 tablespoon milk
  • 1 1/2 teaspoons vanilla extract
  • 1 cup cornflakes cereal, crumbled (I used frosted cornflakes so they wouldn't get soggy in the cookie dough)
  • 3 cups rolled oats (I used quick-cooking, since that's all I had)
  • 1/2 cup flaked coconut (I omitted)
  • 2 cups semisweet chocolate chips
  • 1 cup chopped walnuts
Directions
  1. Preheat the oven to 350 degrees F. Grease cookie sheets. Sift together flour, baking soda, salt, cinnamon, mace, nutmeg, and cloves; set aside.
  2. In a large bowl, cream together butter, brown sugar, and white sugar until light and fluffy. Beat in the eggs one at a time, then stir in milk and vanilla. Gradually mix in the sifted ingredients until well blended. Using a wooden spoon, stir in the cornflakes, oats, coconut, chocolate chips, and walnuts. (I just used my mixer on the lowest speed.) Roll the dough into walnut-sized balls, and place 2 inches apart on prepared cookie sheets; flatten slightly. (I refrigerated my cookie dough over night.)
  3. Bake for 8 to 10 minutes preheated oven. Allow cookies to cool on baking sheets 5 minutes before transferring to a wire rack to cool completely. (I baked my refrigerated dough for 10 minutes, so I'd suggest baking unrefrigerated dough for only 8.)

Saturday, April 24, 2010

Ultimate Stand Mixer Chocolate Chip Cookies

Springtime has gotten the best of me. I'm currently typing this up with a horrible sore throat and stuffy/runny nose, most likely thanks to all of the pollen and whatnot in the air. I baked these up two days ago when I felt the sickness coming on, so as to bake them when I was still well enough and when I was still able to taste things. I came across this recipe on Cookie Madness and they sounded really great, so I knew I had to try them. They're called "Ultimate Stand Mixer" CC cookies because you use a stand mixer to beat a ton of air into the butter, sugar, and eggs. I started out with cold butter that I beat for 5-6 minutes until creamy. Then you add the sugar and beat for another 4-5 minutes, and then add the eggs and vanilla gradually, beating again for about 4-5 minutes. You end up with an extremely delicious light and fluffy cookie dough that I honestly had trouble keeping my fingers out of.

I ended up having a serious soft spot for these cookies because they reminded me of my childhood. I think that's because their flavor is extremely similar to Tollhouse's chocolate chip cookie, which I always used to bake up with my mom when I was little. The difference is that these cookies are wonderfully thick and chewy. When I was little, the Tollhouse CC cookie was the best thing in the world to me, but in recent years, I've found that they're just too thin and crispy for me. I like a nice, thick cookie, and these cookies have that. I don't think these beat my current favorite CC cookie, the Cook's Illustrated CC cookie with that wonderful browned butter flavor, but they're still really great cookies with the traditional CC cookie flavor.

Ultimate Stand Mixer Chocolate Chip Cookie (W. Richard Stevens' recipe. A more printer friendly recipe here.)
Makes about 30-35 cookies

Ingredients
  • 1 cup (2 sticks) unsalted butter, room temperature (as I said, I just started out with cold butter)
  • 1 cup brown sugar
  • 3/4 cup granulated sugar
  • 2 large eggs
  • 1 1/2 teaspoons vanilla extract
  • 1/2 teaspoon salt
  • 2 1/2 cups all-purpose flour (Generally I fluff up the flour and then measure, but I packed a little bit more flour into my measuring cups than usual. This helps to make the cookie thicker. Just know that the heavier handed you are with the flour, the thicker the cookies will be.)
  • 1 1/4 teaspoons baking soda
  • 2 cups walnuts, coarsely chopped (I omitted)
  • 3 cups chocolate chips (I just put in enough for my liking)
Directions
  1. Sift together the flour, baking soda, and salt. Set aside.
  2. Beat butter using a stand mixer at medium speed until it is lighter and clings to the bowl (30-45 seconds). (If starting with cold butter, beat until creamy, about 5-6 minutes.) Keeping the mixer at medium speed, add the sugars in a steady stream. Cream the sugars and butter for 4-5 minutes, until light and fluffy. Scrape down the bowl as needed.
  3. Whisk the eggs and vanilla together in a small bowl. Add the egg mixture very gradually, keeping the mixer on medium speed. Continue to beat 4-5 minutes.
  4. Turn the mixer down to the lowest speed and gradually add the dry ingredients. Add the walnuts and chocolate chips just before the flour is completely incoporated. Mix just until the dough comes together.
  5. Shape the dough into golf ball-sized balls and place on a baking sheet. Place in the refrigerator for at least 6 hours or overnight. Remove and let warm for 30 minutes at room temperature. Flatten slightly into hockey puck-like shapes. (Alright, I must admit...I didn't follow this exactly. I refrigerated all of my dough together over night, and then just scooped dough onto a cookie sheet. I didn't leave them out for 30 minutes, I basically put them in the oven from the refrigerator. I also didn't flatten them. But I do this because I like the thickest cookie possible.)
  6. Bake at 400 degrees F for 8-10 minutes. Let cool for 5 minutes on the sheet, then remove to wire racks. (400 degrees was a bit too high for my cookies. I turned down to 375 and it was perfect.)

Sunday, March 7, 2010

Double Chocolate Muffins

Chocolate muffins seem to be infamous for being so hard to make homemade, being as most recipes tend to be on the dry side, not chocolate-y enough, or too much like a cupcake than a muffin. But, amazingly, this is only the second time I've made chocolate muffins from scratch...and I've found a wonderfully light and fluffy, chocolate-y, and non-cupcake like recipe!! This morning I decided that I wanted muffins for breakfast, but at first I wasn't quite sure what to make. I thought about maybe a spice muffin, or plain vanilla; just something simple being as I didn't have anything special like blueberries, or banana, or pumpkin, etc. But I got to thinking about a chocolate muffin, and possibly one with chocolate chips in it. Like I said before, I've tried making chocolate muffins from scratch once before with not so great results. They certainly weren't very chocolate-y and were dry even after I had added more milk than was called for. I also knew of the difficulty of finding a good chocolate muffin recipe, so I had my work cut out for me.

Finally, my searching brought me to this recipe on Allrecipes. Of course, there were a lot of mixed reviews. Some people thought the muffins were great as is, but there were a lot of people saying things like not very moist, not very chocolate-y, and too sweet. And so like my last post on the banana oatmeal cookies, I decided to take the recipe anyway and just make my own changes to it...and once again ended up with a wonderful recipe! I actually even left out the instant coffee granules I meant to put in to make it a bit more chocolate-y, but it was still a great muffin. I'm really happy that my altered recipes are coming out great here recently, because to me, that says that my baking skills are progressing. I'd eventually like to try my hand at coming up with my own recipes completely, because that seems about the ultimate test. But for now, I'll stick with my tried and true recipes/altered recipes. Now try these muffins!

Double Chocolate Muffins (adapted from Allrecipes)
This time I'm actually going to post my altered recipe instead of the original with my changes in green. I scaled down the recipe considerably since I didn't want a lot of muffins. This recipe makes 5. If you'd like to make the full recipe (about 18-20 muffins), you can double the amounts twice or times them by 4. If you'd like to see the original recipe, I linked it above.

Ingredients
  • 1/2 cup sifted all-purpose flour (What I actually did was fluff up the flour and then measured a scant 1/2 cup. It's probably about equal to a sifted 1/2 cup, so I put it as such to try and give a more accurate measuring. I wish I had a scale to tell you an exact measuring, but unfortunately, I don't.)
  • 2 tablespoons unsweetened cocoa powder
  • 1/4 cup brown sugar
  • 2 tablespoons granulated sugar
  • 1/8 teaspoon baking soda
  • 1/2 teaspoon baking powder
  • 1/8 teaspoon salt
  • (Like I said, I forgot to put it in, but I think it would make the muffins even better...about 1/2 to 1 teaspoon instant coffee granules.)
  • 1/4 cup plus two generous tablespoons milk
  • 1 tablespoon egg (In order to measure this, crack an egg into a bowl, beat it lightly, and then measure out 1 tablespoon. If you don't want to waste the rest of the egg, you can use it to make scrambled eggs or store it in covered in the fridge for later use.)
  • 1 tablespoon vegetable oil
  • 1/4 teaspoon vanilla extract
  • 1/4 cup semisweet chocolate chips
Directions
  1. Preheat the oven to 350 degrees F. Grease muffins cups or line with paper liners.
  2. In a medium bowl, stir together flour, cocoa powder, both sugars, baking soda, baking powder, salt, and coffee granules. Set aside. In a small bowl, whisk together milk, egg, oil, and vanilla. Add the wet ingredients into the dry and mix just until combined.
  3. Fill muffin cups about 3/4 full. Sprinkle chocolate chips evenly on top of the muffins.
  4. Bake muffins for about 20 minutes, or until a toothpick inserted in the center comes out with just a few moist crumbs adhering. Cool in the pan slightly and then remove to cooling racks. Makes 5. These muffins are great warm or at room temperature.

Friday, February 5, 2010

Surprisingly Delicious Light Chocolate Chip Cookies

Yes, you heard me right, a delicious light chocolate chip cookie recipe!! Sounds too good to be true, huh? But the good thing is that it is true! I talked about these cookies in my chocolate cake post, and I've just now gotten around to blogging about them, so sorry about that! Anyways, I first came across this recipe on How To Eat a Cupcake, and I was intrigued. The recipe uses dates in it! You reconstitute the dates in water until all the liquid has absorbed and then put it through a strainer to make puree. I had actually never had a date before this recipe, so before attempting it, I made a quick search online to see what they tasted like, and pretty much just got the answer "sweet." And that's really the truth...I can't really discern a flavor except for sweet, so it was perfect for this recipe!

This cookie is wonderfully chewy inside thanks to the dates, and has a nice crispy outside. I have to admit, this was the second time around I made the recipe and I actually attempted to make it even healthier by upping the amount of dates, reducing the sugar slightly, and adding only an egg white instead of a whole egg. All in all, it didn't really change the stats of the cookies too much, and I don't think I liked the flavor as well as the recipe made to a T. So I definitely suggest making the recipe as it's written first, and then if you want to play around with it a second time, you can. The recipe when made as written produces a very crumbly dough that can be slightly hard to work with, but it is worth it! This second time around, my dough actually came together since I messed around with the recipe, so I don't have pictures of the crumbly dough. To see pictures on that, you can visit Cassie's post on How To Eat a Cupcake. Now on to the recipe!

Light Chocolate Chip Cookies (Originally from The America's Test Kitchen Family Baking Book)
Makes about 18 cookies

Ingredients
  • 1 cup water
  • 1/4 cup finely chopped dried dates
  • 3 tablespoons unsalted butter
  • 2 cups all-purpose flour
  • 1/2 teaspoon baking soda
  • 1/2 teaspoon salt
  • 1 1/4 cups packed light brown sugar
  • 1 large egg
  • 2 teaspoon vanilla extract
  • 1/2 cup semisweet chocolate chips
Directions
  1. Adjust an oven rack to the middle position and heat the oven to 325 degrees F. Line two large baking sheets with parchment paper.
  2. Bring the water and dates to a boil in a small saucepan over medium high heat. Simmer until the dates are tender and most of the water is absorbed, about 20 minutes. Using a rubber spatula, work the dates through a fine mesh strainer into a medium bowl. You should have about a 1/4 of a cup of puree. Then cook the butter in a small saucepan over medium heat until nutty brown, about 4 minutes. Let cool.
  3. Whisk the flour, baking soda, and salt together in a medium bowl. In a large bowl, beat the melted butter, brown sugar, and date puree with an electric mixer on medium speed until smooth, 1 to 2 minutes. Beat in the egg and vanilla until combined, about 3o seconds, scraping down the bowl and beaters as needed.
  4. Reduce the mixer speed to low and slowly add the flour mixture until combined. Reserve 2 tablespoons of the chocolate chips, then mix in the remaining chips until incorporated (as I said, the batter will be really stiff and crumbly, so you can use your hands to bring it together).
  5. (I strongly suggest refrigerating the dough for a couple hours or overnight before baking). Working with 2 tablespoons of dough at a time, roll the dough into balls, tear the balls in half, then press back together with the torn side up (I'm really not sure what the purpose of this is. All it did for me was make it so my cookies turned out ugly, so I just rolled them into balls and baked them just like that...the cookies, or at least my cookies, hold their shape in the oven). Lay the cookies jagged side up on the prepared baking sheets, spaced about 2 inches apart. Press the remaining two tablespoons of chocolate chips evenly over the cookies.
  6. Bake the cookies, one sheet at a time, until the edges are set and beginning to brown but the centers are still soft and puffy, 15 to 20 minutes, rotating the sheet halfway through baking.
  7. Let the cookies cool on the baking sheet for 10 minutes, then serve warm or transfer to cooling rack to cool completely. (I strongly suggest that if there's leftover cookies, to store them in an airtight container with a piece of bread. The cookies when left to sit out get really hard on the outside [though the insides do stay chewy], so putting them in an airtight container with a piece of bread will keep them soft.)

Wednesday, January 13, 2010

Cook's Illustrated's "Perfect" Chocolate Chip Cookie

Man, this cookie was good! I'd say it comes about as close to perfection as a regular chocolate chip cookie recipe can come. I still don't think it beats my favorite cookie recipe of all time (a certain Oatmeal Chocolate Chip, which I will definitely blog about the next time I make them), but it's definitely super high up there on a scale of my favorite cookies. The recipe is actually very close to a chocolate chip cookie that I used to think was the best CC cookie I had come across, called the Best Big, Fat, Chewy Chocolate Chip Cookie, from Allrecipes. There are a few small changes, but the most noticeable one is the one that I think makes all the difference in these cookies and gives them a flavor that's out of this world: browning the butter. The brown butter in these cookies gives the dough the most unbelievably nutty, caramely, delicious flavor ever! The dough tasted kind of like Werther's caramel candies and I had a hard time keeping myself from eating it straight out of the bowl!

One thing that's super important to these cookies though is REFRIGERATION!! I said in my previous post that I always refrigerate my dough because it makes it so the outside of the cookie gets nice and crispy while the insides stay ooey, gooey, and chewy, since the butter in the dough has set and firmed up and therefore doesn't melt as fast and doesn't cause the cookies to spread out as much. This particularly holds true with this recipe. I baked a few right after I made the dough since I was eager to try the recipe and refrigerated the rest. The result was a HUMONGOUS cookie; it had really spread! It was good, but it was a little cripser and not as chewy as I like it. When the dough had set in the refrigerator, I baked a couple more and the refrigeration made a huge difference. The cookie didn't spread nearly as much, was a lot thicker, and was nice and crispy while still gooey on the inside, just like how I like them. It seemed like the caramel flavor of the dough came out a lot more in the refrigerated cookie.

Side by side view.Different thicknesses.

I had actually even found myself wishing that I hadn't put as many chocolate chips in so I could taste the delicious nuttiness of the browned butter more, so maybe next time I'll do that. I'm not allowed to post the recipe here, but I'll direct you to a blogger who received permission from Cook's Illustrated to post it. If you're a fan of the thick, buttery, chewy cookie, definitely give this one a try and you won't be disappointed! Recipe here.

Click on image for full size. I left the overall size of this one a little larger so you could see the cookie's delicious, gooey insides. :) By the way, the recipe calls for you to divide the dough into 16 portions, about 3 tablespoons each. I measured out each cookie with a tablespoon exactly 3 tablespoons each and I only ended up with 11. So if you want to get more out of the recipe, I might suggest scaling down to 2 tablespoons each. But I'm okay with it, as I love big cookies!

Tuesday, January 12, 2010

Chocolate Espresso Cookies

Good afternoon! I hope everyone is doing well. Yesterday the new semester started at my school, but luckily today I don't have any classes, so what better way to spend it than making cookies? I'm not sure how I first came across this recipe, but it's from Epicurious and has a rating of a full four forks, and it certainly lives up to those four forks.

This cookie is intensely dark and rich and just delicious, and it gets rave reviews! Even my brother likes them, and he usually doesn't care much for sweets, so that's a great compliment! :) It contains two types of chocolate, semi-sweet and unsweetened melted and then mixed in and then semi-sweet chocolate chips mixed into the batter. This recipe contains many interesting elements to it that defy a normal cookie recipe. One of these elements is that it contains ground coffee in it. Usually recipes will call for instant coffee powder or maybe even a shot of brewed coffee, but these cookies contain actual ground up beans in them! Secondly, there's no creaming method. Instead, you beat the eggs with the sugar and coffee until it's light-colored, to the ribbon stage. The butter gets melted with the chocolates and then mixed in. And thirdly, the cookie "dough" actually comes out to be a batter. It looks like brownie batter and actually you could probably make these as brownies instead! One of the things I like about this cookie is that if you didn't know the recipe had coffee in it, you probably wouldn't detect it. You'd just taste a deeply, dark, rich chocolate, which is what a love about combining coffee and chocolate. I didn't change a thing from this recipe, except to omit the walnuts.

Chocolate Espresso Cookies (Adapted from Epicurious)

Ingredients
  • 3 ounces unsweetened chocolate, chopped
  • 2 cups (1 12-ounce bag) semi-sweet chocolate chips
  • 8 tablespoons unsalted butter, cut into pieces
  • 3 large eggs
  • 1 cup plus 2 tablespoons sugar
  • 2 1/4 teaspoons finely-ground dark roast coffee beans
  • 3/4 cup all-purpose flour
  • 1/3 teaspoon baking powder
  • 1/4 teaspoon salt
  • 1 cup walnuts (I do like walnuts, but I just didn't want them in my cookie, so I omitted)
Directions
  1. Preheat oven to 350°F and grease 2 large heavy baking sheets. (I just used parchment paper.)
  2. In a double boiler or a metal bowl set over a saucepan of barely simmering water melt unsweetened chocolate, 1 cup chocolate chips, and butter, stirring until smooth, and remove top of double boiler or bowl from heat.
  3. In a bowl with an electric mixer beat eggs, sugar, and ground coffee on high speed until very thick and pale and mixture forms a ribbon when beaters are lifted, about 3 minutes, and beat in chocolate mixture. Into mixture sift in flour, baking powder, and salt and stir until just combined. Stir in remaining chocolate chips and walnuts. (As I said before, the mixture will resemble brownie batter, so don't freak out that it doesn't look like traditional cookie dough!)
  4. Drop batter by heaping tablespoons about 2 inches apart onto baking sheets and bake in batched in middle of oven 8 to 10 minutes, or until puffed and cracked on top. Cool cookies in baking sheets 1 minute and transfer to racks to cool completely. (I always put my cookie dough in the refrigerator for a couple of hours before baking. I really suggest you do that with this recipe too. Not only will the batter stiffen up and be much easier to handle, but refrigeration always helps to give cookies nice chewy centers and crispy edges.)
(By the way, I'm working on making sure I use natural light for my photos. The one of the cookies was taken in natural light while the (awful) picture of the batter (and all of the pictures from the Banoffee Pie recipe ) was taken in artificial. My camera's not that great, but I'm doing my best to take good pictures! :) Thank the lord for Picnik! )