Showing posts with label American buttercream. Show all posts

Thursday, August 12, 2010

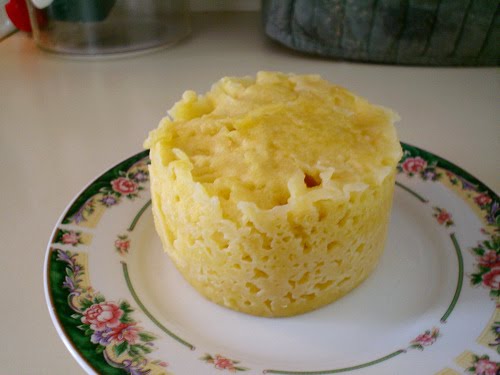
Microwave Yellow Mug Cake

It's been quite a while since I last posted, hasn't it? I apologize for that. I actually haven't been doing a lot of baking here recently, and when I have, they've been things I've already blogged about (like applesauce quick bread and Levain copycats...yum!). But now here I am with a new recipe. This one is as quick and easy as it gets when it comes to making sweets. I'm sure most of you have heard of the microwave mug cake by now. The chocolate one seems to be the most common one made. I've made it before a couple of times myself. But in all honesty, I was never too impressed with it. Sure, it was quick and easy to make, however, the texture was awfully rubbery and dense and the flavor just couldn't make up for it. I often ended up drowning it in a chocolate glaze just to make it edible. It wasn't horrible, but it was far from great. Just recently I got to thinking about it again and then thought, 'What about a yellow cake instead?' But could it end up being any better? I certainly think so!
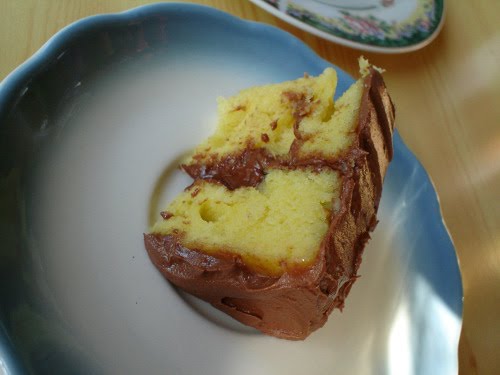
The truth of the matter is, a cake made in the microwave will never be better than one made in the oven. EVER. However, this one is actually pretty good for being made in a microwave. After thinking about a yellow microwave mug cake, a quick search led me to this recipe, and it was the one I went with. The texture still wasn't perfect, however, I thought it was better. It produces a very dense slightly spongy cake that can only be expected since it's made in the microwave. However, the flavor was great, and paired with my go-to chocolate buttercream, it definitely satisfied my sweet tooth! Don't skimp on the flavoring is my advice. I used both vanilla extract and vanilla butter & nut flavoring (which is why my cake is extra yellow, since the flavoring contains yellow food coloring in it). It says just a dash in the recipe, but definitely go with at least a 1/2 teaspoon if you're using vanilla. Or if you're using a stronger flavored extract, adjust accordingly, but as I said, don't skimp! I'm looking forward to trying coconut and almond extracts in the future! Oh, and of course, be sure to use a really large mug. Here's the one I used compared to a normal sized mug.

Microwave Yellow Mug Cake (adapted from momoften's recipe on grouprecipes.com)
Makes one miniature cake that's actually big enough to share with 1 or 2 other people...however, if you want it all for yourself, I won't tell. ;)

Ingredients
  • 6 tablespoons all-purpose flour
  • 4 tablespoons (1/4 cup) sugar
  • 1/8 teaspoon baking powder
  • dash salt
  • 1 egg
  • 3 tablespoons milk or water
  • 3 tablespoons oil
  • dash vanilla extract (or whatever flavoring you like)
Directions
  1. In a small bowl, place the flour, sugar, baking powder, and salt and mix until combined.
  2. In another small bowl, whisk together the egg, milk or water, oil, and extract. Pour into the dry ingredients and whisk until combined.
  3. Spray a small amount of nonstick cooking spray into your mug and pour the cake batter in. (You can actually do this whole process in the mug if you don't want to dirty extra dishes. Just don't spray any cooking spray in it, then proceed to mix your dry and wet ingredients right in the mug.) Microwave for 2 1/2 to 3 minutes. (I only cooked mine for 2 1/2...I think the less you cook it, the less spongy it will be...just don't undercook.) Don't be alarmed if the cake at some point rises above the top of the mug. It will sink back down when you turn the microwave off.
  4. Remove from the mug and enjoy warm or allow it to cool and frost with your favorite frosting. (I used my go-to chocolate buttercream that I also used to frost almond cupcakes.)

Saturday, May 22, 2010

Chocolate Birthday Cake with Strawberry Filling

In my last post I mentioned that I've been baking like crazy here recently since I had two birthdays to prepare for plus the Daring Bakers challenge, so here's the cake from one of the birthdays. One of my close friend's birthday was just recently and I was delighted when I asked her if I could make her a cake and she said yes! I was a little nervous about making the cake and picking out the perfect recipe. I certainly didn't want to disappoint my friend, especially on her birthday! She at first told me that she just wanted a cake with strawberries in it, but after prodding her for more information, she finally decided on a chocolate cake with chocolate frosting and strawberry filling. "Great," I said! I'm not sure if I've mentioned it before, but I have a strawberry patch in my backyard. It's not very big, there aren't multiple rows or anything, but it's substantial enough to put my family into strawberry mania during the summer. So of course, I turned to my backyard for the strawberries, which was great.

I think I went through multiple cake recipes before I finally settled on one. I decided that I wanted to make a three layer cake, and finally thought of this cake that I've seen members of the baking group "The Cake Slice Bakers" bake before. Again, I was nervous. Mayonnaise? Blegh, I hate the stuff. But I've seen it in multiple cake recipes before and everyone always says that it's not detectable at all and makes the cake extremely moist. So I had to put my faith in it. The filling stayed simple and easy, by just cutting up strawberries from my backyard and mixing them with some sugar and layering them in. For the frosting, I wanted to go with possibly my favorite type of American buttercream: a chocolate frosting that uses melted unsweetened chocolate in it. American buttercreams can be extremely sweet what with all the powdered sugar in them, but by adding the unsweetened chocolate, it seems to negate the sweetness and just leaves you with a delectable, chocolatey frosting. I saw this recipe on Smitten Kitchen, and snagged it immediately.

So...was the cake okay? Yup! It was great and was very well receieved! Here is myself heaving a sigh of relief. The cake was, as promised, very moist, soft, and chocolatey, the frosting was perfect, and the strawberries went well with the cake. My friend was happy, so I was happy. (Also, apologies for not having a picture of the inside. I didn't want to impose on my friend's birthday cake, ha ha.)

Triple-Layer Chocolate Cake (from Sky High: Irresistible Triple-Layer Cakes by Alisa Huntsman and Peter Wynne)
Makes 3 9-inch cake layers

Ingredients
  • 2 1/4 cups all-purpose flour
  • 1 cup unsweetened cocoa powder
  • 2 1/4 teaspoons baking soda
  • 1 1/4 teaspoons baking powder
  • 1 teaspoon salt
  • 1/2 teaspoon ground cinnamon (my friend isn't a fan of cinnamon, so I omitted)
  • 2 1/2 ounces unsweetened chocolate, chopped
  • 1 cup milk
  • 1 1/4 cups hot, strongly brewed coffee
  • 2 eggs
  • 1 cup mayonnaise (not low fat or fat free)
  • 1 1/2 teaspoons vanilla extract
  • 2 1/4 cups sugar
Directions
  1. Preheat the oven to 350 degrees. Butter the bottoms and sides of three 9-inch round cake pans. (I actually only have two 9-inch cake pans, but used a 9-inch springform pan as my third, and it worked out just fine.) Line the base of each pan with parchment paper. (I HIGHLY suggest you do this. I didn't have any and so I sprayed and floured my cake pans but the cakes were quite difficult to get out [though still came out in one piece]...so use parchment.)
  2. Sift together the flour, cocoa, baking soda, baking powder, cinnamon, and salt. Set aside.
  3. Place the chopped chocolate in a large, heatproof bowl. (I would suggest one that has a spout.) In a small saucepan, bring the milk to a simmer. Pour the hot milk and coffee over the chocolate. Let stand for a minute, then whisk until smooth. Let the mocha liquid cool slightly.
  4. In a mixer bowl, beat together the eggs, mayonnaise, and vanilla until well blended. Gradually beat in the sugar.
  5. Add the dry ingredients and mocha liquid alternately in two or three additions, beating just until smooth and well blended. Divide the batter among the three prepared pans.
  6. Bake for 25 to 28 minutes, or until a toothpick inserted in the center comes out almost clean. Let the cakes cool in their pans for 10-15 minutes before unmolding onto a wire rack and carefully peeling off the paper. Leave to cool completely.
Instant Fudge Frosting (from Smitten Kitchen)
Makes about 5 cups, enough to frost and fill a 3-layer cake. I only made half of this recipe, and it was just enough to frost the outside of the 3-layer cake, so keep that in mind.

Ingredients
  • 6 ounces unsweetened chocolate, melted and cooled
  • 4 1/2 cups confectioners' sugar
  • 3 sticks (1 1/2 cups) unsalted butter, softened (I used salted)
  • 6 tablespoons half-and-half or whole milk (I only ended up using 1 tablespoon in my halved version, which would be 2 tablespoons for this full recipe)
  • 1 tablespoon vanilla extract
Directions
  1. Place all of the ingredients in a food processor (I just used my stand mixer) and pulse until incorporated, then process until the frosting is smooth.

Strawberry Filling
This is only an estimate, as I didn't really measure anything.

Ingredients
  • 2 1/2 cups chopped, fresh strawberries
  • 2-3 tablespoons sugar
Directions
  1. Place the chopped strawberries in a large mixing bowl. Sprinkle the sugar, to taste, over the strawberries and stir to coat. Allow the strawberries to sit for a few hours in the refrigerator to allow the natural juices of the strawberries to come out.
To assemble the cake:
  1. Situate pieces of parchment paper in a circle around your cake stand or serving plate. Place one layer of the cake on top of the parchment. Put half of the strawberries on the layer, being careful not to place them too close to the edge. Lay the second cake layer on top of the first.

  2. Place the second half of the strawberries on the second layer just as the first, and then top with the final layer. Press down slightly to make sure the cake is secure.
  3. Frost the sides and top of the cake, and then if desired, run your knife or spatula under hot water and use it to smooth the frosting. (I like a rustic look, so I didn't do this.)

  4. Pull the parchment straight out to leave a nice, clean edge. Decorate your cake as desired and serve. The cake is best eaten the day it is made (due to the strawberries).

Thursday, May 13, 2010

Almond Cupcakes with Chocolate Buttercream

So here's recipe #2 in my attempt to post the three recipes I made while my laptop had died on me as quickly as possible. It's funny. When I made these, it actually wasn't because I expressly desired to eat a cupcake, but merely because I really wanted to make some since I hadn't in a long time. I thought about maybe a chocolate cupcake at first but decided I wanted something different and came to an almond cupcake. Have I ever mentioned that I LOVE almond extract? I do, really and truly. I have to admit that I was apprehensive the first time I bought it. I always seemed to read over reviews claiming that the almond in the recipe was too strong, so I came to the conclusion that this stuff could quickly become overpowering, which I don't like in a recipe. But I thought I'd give the extract a try anyway since I saw it so many times when looking through recipes. To my delight, when a first opened the bottle and gave it a whiff, I recognized the flavor! It was just like those Chinese marble cookies from Wegman's that I love! Sure enough, when I tasted it, that was indeed the flavor and my love for almond extract (which I don't find overpowering at all) has been going strong since.

When I began searching for a recipe, I found that it's kind of hard to find just a plain almond cupcake recipe. Most of the recipes I found paired the almond with something else, like chocolate or fruit or what not, or they used actual almond meal in the recipe and I didn't want that. I just wanted a nice, plain almond flavor using extract. Finally I came across this recipe on Recipezaar and it sounded like a winner. I did, however, double the almond extract. At first I was going to pair these cupcakes with an almond Swiss meringue buttercream, but eventually decided against it. Even though I have a love for almond extract, I thought almond on almond might not be exciting enough. In the end, I decided to go with this chocolate buttercream from Joy the Baker that I've been dying to try. I ended up with a nice and tender almond cupcake that was paired with a very delicious chocolate buttercream, neither flavors overpowering the other. And, I finally got to use my 1M tip! Hurrah! Now on to the recipe.

Almond Cupcakes
(adapted from Recipezaar)
Makes 24 cupcakes

Ingredients
  • 3/4 cup butter, softened
  • 1 1/2 cups sugar
  • 2 eggs
  • 3 teaspoons almond extract (If you don't like as much almond flavor, you can reduce the extract back down to it's original measurement, 1 1/2 teaspoons)
  • 1/2 teaspoon vanilla extract
  • 2 1/2 teaspoons baking powder
  • 1/4 teaspoon salt
  • 2 1/2 cups all-purpose flour
  • 1 1/4 cups milk
Directions
  1. Preheat the oven to 375 degrees. Line 2 12-cup cupcake tins with liners.
  2. Cream the butter at medium speed in the bowl of an electric mixer until smooth. Add the sugar and beat until light and fluffy. Add the eggs and extracts and beat until combined.
  3. Combine the baking powder, salt, and flour in a medium bowl. Add the flour mixture to the batter alternately with the milk, starting and ending with the dry ingredients. Mix just until combined.
  4. Divide the batter in between 24 cups and bake the cupcakes until a toothpick inserted in the center comes out clean, about 17-20 minutes. (I seem to remember my batch taking only about 17 minutes to bake, so make sure to watch them.) Allow the cupcakes to cool for a couple minutes in the pans and then remove to a wire rack to cool completely.

The "Best" Chocolate Buttercream (from Joy the Baker)
Makes enough to generously frost 24 cupcakes

Ingredients
  • 1 1/2 cups (3 sticks) unsalted butter, softened (I used salted butter)
  • 1 cup cocoa powder
  • 3/4 teaspoon salt (I didn't add this since I used salted butter, but in the end I did end up using another small pinch of salt)
  • 4 cups powdered sugar
  • 1 teaspoon vanilla extract
  • 1/4 cup milk
  • 1 cup heavy cream (I would halve this...more notes below)
  • 2/3 cup Ovaltine
Directions
  1. Cream together the butter, cocoa powder, and salt. The mixture will be very thick. Turn off the mixer and scrape down the sides and then add the powdered sugar. Turn the mixer on low and mix in the powdered sugar slowly while adding the milk and vanilla extract. As the sugar incorporates, raise the speed of the mixer and beat the frosting. Beat until smooth.
  2. In a 2-cup measuring glass, mix together the heavy cream and Ovaltine. Turn the mixer on medium speed and stream in the Ovaltine mixture slowly until you have reached the desired consistency. You may not need the full amount of cream and Ovaltine. (In my experience, I ended up barely needing any of it. I actually ended up adding a bit more Ovaltine to my buttercream, so I would highly suggest halving the cream but keeping the Ovaltine amount the same.)

Sunday, February 28, 2010

Chocolate Peanut Butter Cupcakes

The desire to try this recipe came from, of course, the classic peanut butter and chocolate combination, Reese's peanut butter cups. I actually hadn't had one in a long time until my dad bought a Valentine's box of mini Reese's on sale after Valentine's Day. While I like Reese's, I have this weird thing about peanut butter where I only eat it when I truly desire to eat it. I know that sounds totally weird and confusing, but it's kind of like this: for example, I could eat chocolate all the time. I adore it, and can eat it over and over without ever getting sick of it. But with peanut butter, if I eat too much of it in a short amount of time, I get tired of it and lose interest. So many of the minis disappeared without me eating a single one. It wasn't until there were only a couple left that I had one and suddenly realized how I had forgotten about how good they were. So I had to try the combo in cupcake form!

I planned to make them as chocolate cupcakes with a peanut butter frosting, and in particular, was eyeing this recipe of Ina's. But it had a couple of things in the recipe that I usually don't keep on hand and I also finally decided that I wanted a predominantly peanut butter taste than chocolate. I felt that if I made chocolate cupcakes, the chocolate flavor would be stronger than the peanut butter, and I really wanted the peanut butter to shine. So I found this recipe on Allrecipes. One thing that really stood out to me was that the recipe had cream of tartar in it. I've never in my life seen a cupcake recipe or any cake recipe besides Angel Food that had cream of tartar in it. I also read some of the reviews and decided to use oil in place of shortening. And my lord, the resulting cupcake was INCREDIBLY soft and fluffy! I honestly don't think I've ever made cupcakes as soft as these, and I have to think that it was the cream of tartar that did it. It definitely got me thinking about finding other recipes that used tartar in it or even coming up with my own that has it in the recipe. In the end, the cupcake was delicious and definitely great for the first peanut butter cupcake recipe I tried. I paired it with my old standby chocolate buttercream and it had a nice, Reese's flavor. I eventually would like to try the reverse, chocolate cupcakes with peanut butter frosting, but for now, these were great.

Peanut Butter Cupcakes (adapted from Allrecipes)
I halved the recipe twice and had enough batter for 7 cupcakes. A read a lot of reviews that said they were able to get about 30 cupcakes, so assume that this full recipe will make about 28-30.

Ingredients
  • 2 cups brown sugar
  • 1/2 cup vegetable oil
  • 1 cup peanut butter
  • 2 eggs
  • 1 1/2 cups milk
  • 1 teaspoon vanilla extract
  • 2 1/2 cups all-purpose flour
  • 1 teaspoon baking soda
  • 2 teaspoons cream of tartar
  • a pinch of salt
Directions
  1. Preheat the oven to 350 degrees F. Line a cupcake pan with paper liners or grease and flour cups.
  2. In a large bowl, mix together brown sugar, oil, and peanut butter and beat until thoroughly combined. Beat in eggs one at a time, then stir in vanilla. Combine the flour, baking soda, cream of tartar, and salt in a medium bowl; stir into the batter alternately with the milk, starting and ending with the dry ingredients. Spoon into the prepared cups.
  3. Bake for 15 to 20 minutes in the preheated oven, until the top of the cupcakes spring back when light pressed (or until a toothpick inserted in the center comes out clean. Don't be fooled by the cupcakes like I was. I thought 15 minutes was too little as almost all cupcakes take at least 18 minutes to bake. The tops to me still looked a little wet and so I didn't even test them at 15 minutes. 2 minutes later they were starting to brown, although still looking a little wet on top, but I checked them anyway. Sure enough, they were done, so don't be fooled!) Cool in the pan about 10 minutes before removing to a wire rack to cool completely.
Creamy Chocolate Frosting (from Allrecipes)
This recipe makes enough to thinly frost about 24 cupcakes, so if you're making the full cupcake recipe, you may want to times the recipe by 1.5.

Ingredients
  • 2 3/4 cups confectioner's sugar
  • 6 tablespoons unsweetened cocoa powder
  • 6 tablespoons butter (I always use salted. If you only have unsalted, add a good pinch of salt)
  • 5 tablespoons evaporated milk (I always use regular 2% milk since I almost never have evaporated milk on hand. But if you have it, definitely use it)
  • 1 teaspoon vanilla extract
Directions
  1. In a medium bowl, sift together confectioner's sugar and cocoa powder. Set aside.
  2. In a large bowl, cream butter until smooth, then gradually beat in sugar mixture alternately with the milk. Blend in vanilla. Beat until light and fluffy. If necessary, adjust consistency with more milk or sugar (or cocoa powder). Use to frost cupcakes.
By the way, I totally meant to pipe a different kind of pattern on these cupcakes since I all too often just go back to the classic swirl. But there's just something about the swirl that captivates me and so I just did it by instinct! I think what I'm getting tired of is the fact that I actually only have one star tip, a Wilton #32 open star that I've used for all of the cupcakes I've posted so far. (The only other tips I have are two petal tips, a leaf tip, and a very small round tip that I actually haven't even used yet...I find trying to make buttercream flowers intimidating!) I've been dying to get a 1M tip that seems to be the standard for the classic swirl but just haven't dragged myself up to Michael's to get it. But luckily, tomorrow I have to head up there anyway to get some stretcher strips for a new painting of mine, so as long as I remember, I'm definitely getting it then!

Saturday, February 6, 2010

Yellow Cupcakes with French Silk Frosting

Here on the east coast we're currently getting SLAMMED with snow! And when I say slammed, I mean it! The numbers they've been predicting on the news has grown and grown, and it currently stands at 20-30 in, and I certainly believe them! A small tree in my front yard is currently totally weighted down with snow and my little Volkswagen Beetle is practically covered, ha ha! Anyways, I actually made these cupcakes two nights ago, but didn't get around to blogging them since I still had to blog about the light CC cookies, and didn't feel like typing up a whole nother post, but here I am now, and trust me, this recipe is absolutely delicious and one of my favorites!

What makes this recipe so delicious and addicting is certainly thanks to the vanilla butter & nut extract that McCormick makes! I discovered the cupcake recipe and the info about the extract on How To Eat a Cupcake. She had said that the extract was practically like yellow cake mix in a bottle! Yum! Even though I fully believe in baking from scratch, I do have a soft spot for the flavor of boxed cake mixes, being as that's what I grew up with. The extract really makes the cake, and while you could substitute with vanilla, it just won't be the same, so I suggest searching your store for this wonderful extract. Yes, it is imitation, but with all the processed foods we eat now anyway, I assume a tiny bit of extract in a cake recipe won't do much more harm. There were two bottles in just one store in my town and as soon as I made this recipe, I went back and bought the other bottle just in case they ran out and didn't restock!Also, the French Silk frosting is wonderful as well! French Silk refers to the light chocolate flavor like you get in a French Silk pie. It's an American buttercream (powdered sugar, butter, milk, flavoring), which usually I don't like too much because it's sickeningly sweet, but this recipe is actually great and not too sweet thanks to the unsweetened chocolate that you melt down and put into the recipe. It has a really great flavor and nice amount of sweetness. Now I've talked too long...on to the recipe!

(You could use better quality chocolate if you wish...but regular old Baker's chocolate works fine for me)

Yellow Cupcakes
(Originally called Supermarket Yellow Cake for Strawberry Shortcake and adapted from A Passion for Baking by Marcy Goldman)
Makes 12 cupcakes

Ingredients
  • 1/2 cup unsalted butter, softened
  • 1 cup sugar, finely pulverized (I actually didn't do this, and my cupcakes were still great. If you want to follow it though, just whir the sugar in a food processor for 1-2 minutes or you can use caster/superfine sugar, which has already been pulverized)
  • 1 large egg
  • 1 1/2 teaspoons vanilla butter & nut extract (The original called for vanilla...but use vanilla butter & nut, I promise it's delicious!)
  • 1 1/2 cups all-purpose flour
  • 2 teaspoons baking powder
  • 1/4 teaspoon salt
  • 1 cup warm milk (This last time, I accidentally let my milk get hot, but used it anyway...seemed like the cupcakes came out even moister!)
Directions
  1. Preheat oven to 350 degrees F. Line a standard cupcake tin with 12 paper liners.
  2. In a mixer bowl, cream butter and sugar until light and fluffy. Add egg and vanilla butter & nut extract and mix well.
  3. Add flour mixture alternately with the milk, starting and ending with the dry ingredients. Mix just until flour and milk are fully incorporated.
  4. Pour batter evenly into prepared liners. Bake 18-20 minutes, or until a toothpick inserted in the center comes out clean. Cool completely before frosting.
French Silk Frosting (From allrecipes.com)
Makes enough to frost 12 cupcakes

Ingredients
  • 1 1/3 cups confectioners' sugar
  • 1/3 cup (5 1/3 tablespoons) butter, softened (I always use salted for American buttercreams. If you only have unsalted, add a pinch of salt)
  • 1 (1 ounce) square unsweetened chocolate, melted
  • 1/4 teaspoon vanilla extract
  • 1 tablespoon milk
Directions
  1. In a medium bowl, blend confectioners' sugar, butter, melted chocolate, and vanilla on low speed. Increase speed to high. Gradually add milk; beat until smooth and fluffy.

Thursday, January 21, 2010

Extreme Vanilla Cupcakes

Even though I had a major disappointment before I made these, the resulting cupcake was awesome and definitely made me brighten up! I first stumbled upon the recipe on a blog called justJENN recipes, under the name "VERY Vanilla Cupcakes," but I made a few changes from the recipe that warranted the name "Extreme!" These cupcakes are chock-full of vanilla in three forms: extract, vanilla milk, and, in with my change, vanilla bean. In Jenn's original recipe, she used vanilla sea salt, but since I didn't have any, I decided to substitute vanilla beans instead.

Anyways, the disappointment had to do with the mini little nut & party cups I was planning on making these in. I've seen them used in multiple blogs and being as I've never made mini cupcakes, the prospect sounded incredibly fun! I found Wilton nut & party cups at Michael's and was excited as I opened the package. I thought they'd be great, especially for someone like me since they stand up by themselves and don't require a mini cupcake tin, something that I don't have. But lo and behold, when I opened the package, they had a wax coating on the inside!! ARGH! Those can't go in the oven! I was so upset, particularly so because the packaging didn't even mention that they had a wax coating and were unsafe for baking. So I had to drag out the ol' regular-sized cupcake tin and paper liners. Definitely not as exciting.

But like I said, the resulting cupcake was still great, so all was good. By the way, please excuse my crazy piping on the cupcake. This is really the first time I've ever seriously tried piping anything, so I know it looks a little ridiculous, ha ha! I just tried a regular swirl at first, but I didn't quite get the edges, so I went back and did some crazy shell-like border around the edges. Feel free to giggle, as I certainly did! But I had a lot of fun trying to pipe and I look forward to practicing and getting better!

Extreme Vanilla Cupcakes (Adapted from justJENN recipes)
I halved the recipe twice and only got 4 cupcakes, so it's safe to say that this full recipe will yield about 16 cupcakes.

Ingredients
  • 3/4 cup (1 1/2 sticks) butter, room temperature
  • 1 3/4 cups sugar
  • 3 eggs
  • 2 1/4 cups cake flour (Again, I always use the all-purpose and cornstarch trick. See post below for how-to.)
  • 1 1/2 teaspoons baking powder
  • 1/4 teaspoon vanilla sea salt (I just scraped in some vanilla beans and used regular salt)
  • 1 cup vanilla milk (Jenn used Horizon Organic Vanilla Milk. I didn't have any, so just put a couple drops of vanilla into regular old 2%)
  • 1 tablespoon vanilla
Directions
  1. Preheat oven to 350 degrees F. Line cupcake tin with paper liners.
  2. In a medium bowl, whisk together cake flour, baking powder, and sea salt (or whatever salt you're using). Set aside.
  3. Cream the butter and sugar until light and fluffy. Add eggs one at a time until incorporated and then vanilla (and vanilla bean seeds, if using).
  4. Add milk, alternating with the dry ingredients until combined, starting and ending with the dry ingredients.
  5. Spoon batter into prepared liners and bake for about 20 minutes, or until a toothpick inserted into the center comes out clean. Let cool in pan for a few minutes and then transfer to a wire rack to cool completely.
Jenn said in her post that she just frosted with a simple vanilla buttercream. Since I wanted to keep with the amped up vanilla theme, I frosted with a vanilla bean buttercream, yum!

Vanilla Bean Buttercream (adapted from Oprah.com...yes, Oprah.)
(This recipe is enough to frost 24 cupcakes, so it'll be more than you need. Feel free to reduce the ingredients slightly.)

Ingredients
  • 1/2 cup (1 stick) unsalted butter, room temperature
  • 1/2 vanilla bean, scraped
  • 1/2 teaspoon salt
  • 1/3 cup milk
  • 4 cups confectioners' sugar
  • (I also added in a little shot of vanilla extract! Yay, vanilla!)
Directions
  1. Cream the butter in a medium-sized bowl (or stand mixer) until very smooth. Add vanilla bean seeds and mix until they are evenly distributed.
  2. Add salt and milk (and vanilla extract, if using) and stir until combined (it probably won't come together very well being as it's fat and a liquid, but don't worry about it. It'll all come together once you add the sugar.)
  3. Sift the confectioners' sugar over the butter mixture and beat until perfectly smooth. If too loose, add some more confectioners' sugar. If too stiff, add some more milk.
By the way, as I was editing and adding text to my photo, I found this effect on Picnik:Ha ha!! Vanilla cupcake is all powerful! x)