Showing posts with label banana. Show all posts

Wednesday, August 25, 2010

Brown Sugar Banana Bread

It always seems that whenever my family gets bananas at the grocery store, there are always a couple left over that don't get eaten. They just hang there on the banana hook and continue to become more and more ripe. Of course, what better to do with them then than to make a banana bread? I've already shared my favorite banana bread on here before, and although I love that recipe, I thought for once I might change it up and try a different recipe. This one in particular had caught my eye not too long ago on Allrecipes. It doesn't have too many reviews on it so far, but the small amount it has are quite positive. Most reviewers described the bread as having a wonderful flavor and a super soft texture thanks to the brown sugar. The one thing that worried me was that a couple of reviewers had trouble with the bread sinking in the middle the first time they tried it. But most people who had trouble with that had said that the second time they made it, it came out perfect, and provided tips for what they did to make it not sink. So with ripe bananas and tips on hand, I went to make this bread for breakfast.

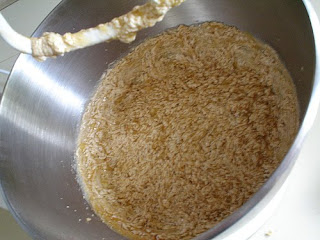
One really interesting thing about this recipe is that it has very different directions than most quick breads. Generally for quick breads or muffins, you use the "mix, mix, pour, mix" method. As in, you mix together the dry ingredients in one bowl, mix together the wet ingredients in a second, pour the wet ingredients into the dry and mix again until combined. However, the mixing method for this recipe is actually more like a cookie recipe. You beat the brown sugar and butter until fluffy, then add the smashed bananas, egg, cinnamon, vanilla, and milk, and then add the dry ingredients. Using the advice of some of the reviewers, I beat my butter and sugar for quite a while, at least 7-8 minutes until it was incredibly light and fluffy. I also let my egg come up to room temperature, and though I didn't have time to let my milk come to room temperature, I zapped it in the microwave until warm. The result was an incredibly creamy and delicious batter that I had problems not eating straight out of the bowl! The reviewers also suggested that the cooking time wasn't long enough, so I let it go longer than called for until a toothpick came out clean. Sure enough, I ended up with a non-sunken, soft-textured, delicious tasting banana bread. I'm not sure if I like it better than the banana bread recipe I've already posted, but it's certainly on par with it, and definitely a recipe I'll keep and make again!

Brown Sugar Banana Bread
(from allrecipes)
Makes 1 9x5 inch loaf

Ingredients
  • 4 ripe bananas, cut into chunks (I only used 3 medium, since that was all I had)
  • 1 1/4 cups light brown sugar
  • 1/2 cup butter, softened
  • 1 egg
  • 1 teaspoon cinnamon
  • 1 teaspoon vanilla extract
  • 1/4 cup whole milk (I used 2%)
  • 2 cups all-purpose flour
  • 1/2 teaspoon baking soda
  • 1 teaspoon baking powder
  • 1/2 teaspoon kosher salt
Directions
  1. Preheat oven to 350 degrees F (175 degrees C). Grease a 9x5-inch loaf pan.
  2. Place the bananas into a large plastic zipper bag, seal the bag, and smoosh the bananas with your fingers until very well mashed. Set the bananas aside. Place the brown sugar and butter into a mixing bowl, and mix on medium speed with an electric mixer until light and fluffy, 1 to 2 minutes. Cut a corner from the plastic bag, and squeeze the mashed bananas into the bowl of brown sugar mixture. With the electric mixer on medium speed, beat in the bananas, egg, cinnamon, vanilla extract, and milk until the mixture is well combined. (Don't be surprised at this point if the mixture looks really curdled...once you add the flour, it'll be fine!) Switch the mixer to low speed, and gradually beat in the flour, baking soda, baking powder, and kosher salt just until the batter is smooth, about 1 minute. Spread the batter into the prepared loaf pan.
  3. Bake in the preheated oven until the bread is set and lightly browned on top, about 40 minutes. (Mine took 50 minutes to bake, and some reviewers said their bread took closer to 60...just remember to watch it!) A toothpick inserted into the center of the loaf should come out clean. Let cool in the pan slightly, then remove to a wire rack to cool completely.

Friday, March 5, 2010

Banana Oatmeal Cookies

In all honesty, this wasn't a cookie I was planning on making at all. In fact, I had the plan to make the Dulce de Leche Duos from Dorie Greenspan's Baking From My Home to Yours that I've been DYING to make. The only problem was that I was running low on flour and didn't have any dulce de leche. A couple of times I almost made a trip to the grocery store, but since I needed a couple of hygienic necessities from Wal-Mart, I thought I would go ahead and get them there. But much to my dismay, it turned out my Wal-Mart doesn't carry dulce de leche and I just didn't feel like making a trip to the grocery store too. But, I plan on going to Costco tomorrow and so I decided to put off my trip to the grocery, which is luckily right across the street from there, until then. So now, being as I was in need of a sugar fix, I turned to a different cookie to tie me over.

I thought about making a chocolate chip cookie recipe that I've been wanting to try, but decided I wanted something different. I picked up some nutmeg and cloves, two spices that I've miraculously never used, from Wal-Mart so I thought about a spice cookie. I turned to my trusty recipe website Allrecipes and ran a search. But that lead to me looking at a banana spice cookie recipe, and then that in turn lead to looking at a banana oatmeal cookie recipe! I decided that that was what I wanted, and so took a look around at the different recipes. Turns out, nearly all of them are the same. In fact, I even looked at a Martha Stewart banana oatmeal cookie recipe, and that one was nearly the same too, ha ha! The reviewers informed me this was a cakey cookie, which I almost never make, so I thought it would be good to try. I was a little wary because the recipe had really mixed reviews, some saying the cookie was dry, some saying that it was bland, etc., but since I've never tried a cookie like this, I thought I would go with it and add a few things to make sure the cookie was full of flavor. A couple substitutions and some add-ins did the trick, and the resulting cookie was DELICIOUS! I think they may even have better flavor than my favorite banana bread! But expect to see those Dulce de Leche Duos on here soon, because as soon as I get my hands on some dulce de leche, I'm definitely making them!

Banana Oatmeal Cookies (adapted from Allrecipes)
As always, my changes and additions are in green. I really encourage you to make these changes. Recipe says it yields about 3 1/2 dozen, but again, if you make yours bigger like me, you'll probably only get about 2 dozen.

Ingredients
  • 1 1/2 cups all-purpose flour
  • 1/2 teaspoon baking soda
  • 1 teaspoon salt
  • 1/4 teaspoon ground nutmeg (I added an extra tiny pinch...be careful with nutmeg, it can be a bit strong)
  • 3/4 teaspoon ground cinnamon (I added an extra shake or two)
  • 3/4 cup shortening (I used butter)
  • 1 cup white sugar (I used 3/4 cup brown sugar, 1/4 cup white)
  • 1 egg, beaten
  • 1 cup mashed, ripe bananas
  • 1 3/4 cups rolled oats
  • 2 teaspoons vanilla extract
  • 1 tablespoon honey
  • 1/2 cup chopped walnuts (I omitted)
Directions
  1. Preheat oven to 400 degrees F.
  2. In a medium bowl, stir together flour, baking soda, salt, nutmeg, and cinnamon. Set aside. In a large bowl, cream together the butter and sugars; beat until light and fluffy. Add egg, banana, vanilla, and honey and mix until well incorporated. Add oats and mix until combined. Slowly add dry ingredients and mix until incorporated.
  3. Drop cookies onto a baking sheet lined with parchment paper (I ran out, and so used aluminum foil sprayed with a little non-stick cooking spray to be safe. I definitely think they would have stuck if I hadn't). Bake for 9-12 minutes or until edges begin to brown. (The original recipe called for 15 minutes!! Mine were done at 9! Though I might suggest turning the oven down to 375.) Cool on sheet slightly then remove to a wire rack to cool completely. Store in a closed container.
I made a couple of cookies right after I made the dough and then the rest after I'd refrigerated the rest of the dough. These are the juxtaposed refrigerated dough cookie (left) and nonrefrigerated dough cookie (right). This is a cakey cookie, so the refrigeration actually doesn't make a load of difference besides it being thicker and puffier, but I thought maybe it was a little more moist. If you decide to refrigerate your dough, I'd advise turning the oven down to 350, as mine started to burn around the edges before the cookie was done! Definitely try this cookie, though. It's great!!

Friday, February 19, 2010

Banana Bread

Do you ever feel as if you only enjoy a fruit when it's in its straight from the grocery store form? As in, you love the fruit as it is, but you just don't seem to like it when it's in any kind of dessert or baked good? Well, maybe not, but I certainly feel that way about a couple of fruits, and one of which is banana. I love bananas as is, but things like banana cream pie, banana pudding, even the banana/peanut butter combo, I'm just not a fan. Though, I do have a couple exceptions. One of them is Banoffee Pie. The other is banana bread...THIS banana bread. I've tried banana bread in the past, but for some reason, they just didn't do it for me. And so I became convinced that I just didn't like the stuff. But one day I had a couple of super ripe bananas laying around that needed to be used, and came across this recipe on Diana's Desserts and decided to give it a go. And...it's fantastic!

I think what I love about this banana bread is that it doesn't have a super strong banana flavor to it that always seemed to put me off of other banana breads I tried. Who knows? For all I know, the ones I've tasted in the past could have had some artificial or even pure banana extract added to them, and I just wasn't a fan. This bread also has cinnamon added to it, which is, in my opinion, such a great compliment. It is also incredibly moist, coming from not only the bananas, but from buttermilk and applesauce to give it a triple boost of moistness. It's perfectly sweet, and even better the next day after the flavors get a chance to mingle and harmonize and is the perfect addition to morning coffee or a hot cup of tea. All in all, I must say brava. It was enough to convert me and my finickiness, so I'd definitely say to give this bread a try.

Super ripe bananas. At one point, I was worried they might be too far gone, but they were just fine. :)

Buttermilk Banana Bread (From Diana's Desserts)
This recipe is halved in order to make one 9x5 inch loaf. If you'd like to make both loaves, you can double the recipe, or visit Diana's post here.

Ingredients
  • 2 cups all-purpose flour
  • 2 teaspoons baking powder
  • 1/2 teaspoon baking soda
  • 1/2 teaspoon salt
  • 1/2 teaspoon ground cinnamon (I used a little more to make up for the fact that I didn't include the other spices)
  • 1/16 teaspoon ground nutmeg (I omitted. You can just eyeball this by filling your 1/8 teaspoon half full.)
  • 1/16 teaspoon ground ginger (Again, I omitted, and just eyeball it.)
  • 1/2 cup granulated sugar
  • 1/4 cup brown sugar (light or dark), firmly packed
  • 1/2 cup (1 stick) unsalted butter OR 1/2 cup vegetable oil (I always use vegetable oil)
  • 2 large eggs, lightly beaten
  • 1/2 cup fresh buttermilk
  • 1 teaspoon vanilla
  • 2 large ripe bananas, mashed
  • 1/4 cup applesauce (You can use sweetened or unsweetened. I've used both in the past and find that it makes no difference.)
  • 1/2 cup pecans or walnuts, chopped (optional) (I don't like nuts in bread, so I always omit)
Directions
  1. Preheat the oven to 350 degrees F. Spray one 8 1/2 x 4 1/2 inch loaf pan (or a 9x5) with nonstick cooking spray and, if desired, line the bottom of the pan with parchment paper; spray parchment paper also. (I sprayed mine with nonstick cooking spray and then dusted with flour.)
  2. In a large mixing bowl, whisk together flour, baking powder, baking soda, salt, cinnamon, nutmeg, ginger, and both sugars. Mix thoroughly; set aside.
  3. In a medium size mixing bowl, mix together the melted butter (or oil), the lightly beaten eggs, the buttermilk, and the vanilla. Stir into the flour and mix just until combined. Do NOT overmix. Fold in the bananas, applesauce, and the chopped nuts, if using.
  4. Pour the batter into the prepared loaf pan. Bake for 55-60 minutes or until a toothpick inserted into the middle of the loaf comes out dry. Transfer loaf to a cooling rack and let cool in pan for 15 minutes, then invert the loaf onto the rack to let cool completely.
**Note: This bread keeps quite well tightly wrapped in plastic wrap for up to five days at room temperature or 3 months in the freezer. Can also be stored in the refrigerator if necessary.

Oh, and also. This banana bread recipe can easily be turned into muffins, if you so wish. That's actually what I usually make this recipe as. Just increase the oven temperature to 375 degrees F and bake for about 20 minutes and voila! =)

Friday, January 8, 2010

Banoffee Pie

Hello to anyone who happens to be reading this, and welcome to my new blog!! I greatly enjoy surfing the internet and looking at other baking blogs and have been dying to start one of my own, so here I am! I've been baking from scratch for two years now, and I am completely in love with it. And of course, not to mention that it satisfies my monster sweet tooth! Here I simply intend to blog about my baking adventures and share great recipes. And what better way to start out the new blog then with a Banoffee Pie?

Banoffee Pie is an English dessert, and the name comes from the combination of the w
ords banana and toffee. The funny thing about this pie is that it actually doesn't contain any toffee at all. Instead, it's made by layering caramel sauce (which I guess counts as the toffee, in this case) and bananas in a pie crust and then topping with whipped cream. Believe it or not, I got the idea to make a Banoffee Pie from watching my favorite show: Lost! One of the characters, Charlie (who is indeed English), names Banoffee Pie as one of the things he misses most stranded on the island. I had never heard of this pie, so it intrigued me. After looking it up and realizing I had ripe bananas that needed to be used, I decided to make it. A lot of recipes I looked over used dulce de leche as the caramel sauce (sweetened condensed milk boiled until it becomes a caramel), but this recipe was a little different and had rave reviews so I went with it.

The pie itself was very good. The caramel sauce was particularly good. I really didn't change much from the original recipe except to add my own little bits of flair. And well, I must admit that I did cheat a little and used a pre-made pie crust simply because I didn't want to fool with making one. My notes and changes will b
e in green.

Banoffee Pie (Adapted from nestle.com, and converted from metric i
nto U.S. cups)

For the crust:
  • 7 tablespoons unsalted butter, melted
  • 2 1/2 cups digestive biscuits, finely crushed (These are a kind of British cookie. If you cannot find them in your grocery store, graham crackers or any kind of crispy cookie can be substituted.)
  1. Mix together the melted butter and the crushed digestive biscuits. Press on to the base and up the sides of a 9 in. pie pan (The original recipe called for a 19cm (7 1/2") loose bottomed cake tin. It kind of sounded like a springform pan, but I wasn't sure, so I just used a regular old 9 in pie tin and it worked out fine). Place in the fridge to chill whilst preparing the caramel.
For the caramel:
  • 3/4 cup unsalted butter
  • 1/3 cup caster sugar (Caster sugar is very fine sugar, and may also go by the name superfine. If you can't find it, you can measure out regular granulated sugar and put it in the food processor for a minute or two.)
  • 1/3 cup brown sugar, packed
  • 1 can (397g) NESTLÉ CARNATION Sweetened condensed milk
  • Couple pinches salt, maybe about 1/2 teaspoon
  1. Place the butter and sugars and salt in a heavy saucepan (definitely add salt to your caramel to keep it from tasting flat). Heat gently, stirring until the butter is melted and the sugars are dissolved. Add the contents of the NESTLÉ Sweetened condensed milk. Bring gently to the boil, stirring continuously, and cook until a smooth golden brown caramel is formed (The caramel will never become a dark amber color. You're looking for a very light tannish color. You'll know when it's done because it becomes much thicker).
  2. Spread the caramel over the chilled biscuit base. Leave to set in the refrigerator for 1-2 hours.

To assemble:
  • 4 bananas (I only ended up using 2 large ones, since that was what I had.)
  • 1 cup whipping cream
  • 2 tablespoons sugar
  • 1-2 tablespoons French vanilla pudding mix
  • cocoa powder for dusting
  1. Place the whipping cream, sugar, and pudding mix (I like to add pudding mix to my whipped cream because it not only adds great flavor, but stabilizes the whipped cream and keeps it from weeping) in a chilled bowl and beat with a chilled whisk until peaks form.
  2. Slice the bananas and arrange them evenly over the caramel. Top with whipped cream and decorate with a dusting of cocoa powder and any remaining banana slices.